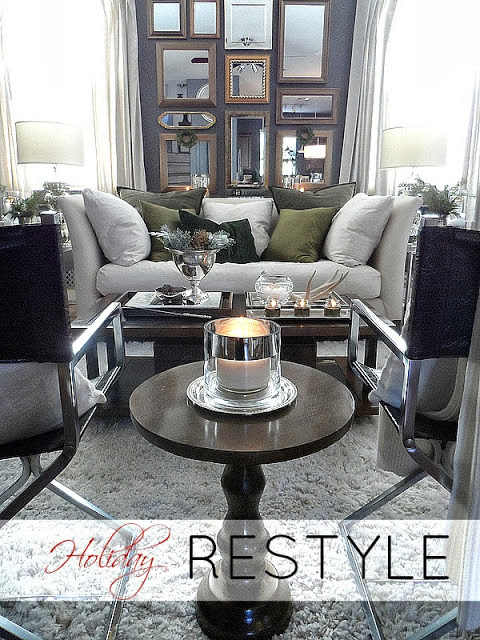
Love the look of the gold mirrors on the dark grey wall.
Here is how I made my mirror gallery wall....
I started with a vision and a plan...
I used the garage floor first to layout the mirrors - like a puzzle...
I double checked the width to ensure it would fit in between the windows and above the sofa plus table...
A 'quick' spray of antique gold in the back yard...
A quick clean up with mineral spirits and a razor...
(Sometimes pre-cutting paper and taping takes too long and some paint comes through anyways) After soaking the mirror with mineral spirits, I was able to scrape the
excess paint off with the razor - and not scratch the mirror + come
close to the edge for a crisp clean finish.
Good as gold!:)
Ready to bring inside to hang...
Supplies all pull together on my work tray (old cookie sheet)
Chalk (because my walls are dark), level, tape, nails -- and yes: nail hole filler and paint to repair prior holes (remember: I'm renting)...
Space cleared and I used some foamcore boards to re-layout the composition I had done in the garage...
Started from the top and across... then worked my way down the wall...
I really like the mix of gold shades vs being all one...
It was nice with the B&W images of NYC for a while, especially since we had just moved to AZ from the east coast. But as in Florida, I've since relocated the NYC to the home office (another time when something just worked and felt right.) Here is a look at the subtle changes, mostly coming from switching pillows on the sofa, but all working with the gallery wall focal point -- especially the mirrors...
Spring 2012
Mirrors mixed with images..
Summer 2012
Autumn 2012
Holiday Home 2012 plus see more photos at
Spring 2013
Bold B&W prints with Tribal Maze and Houndstooth...
Autumn 2013
Yes - in Florida I did more with color, but here in AZ, it just feels right mixing plaids (windowpane, glen plaid, and houndstooth) - especially in Fall paired with leopard...
Autumn 2013
I'll probably go back to greens and whites for holiday this year, maybe with a few touches of red, but I really liked the green and white last year. Since it does get really cold here in the winter, many leaves die off tress and everything gets REALLY brown and overcast. Funny how three of these mirrors started off gold (back in the 90s) and I painted the silver (remember "JOY" for the Christmas bedroom I did?) and now they are back to gold.
Everything old is new again - except me - I'm just getting older!! lol
Thanks for stopping by...


.jpg)

+f800+2013+(164).jpg)


Love the mirror gallery wall...I have (well it's packed now..lol) a vintage mirror gallery wall in my office. Not sure where they will go in the new house. Moving date is next weekend....so I will definitely be back for some holiday inspiration.
ReplyDeleteLove your Jersey Girl.
The mirrors look amazing and I love how you also have silver in other areas. It seems like the new rule in design is that there are no rules to decorating--to a certain extent that is. I love the idea of using mineral spirits to clean up the mirrors. But how did you use the razor? Did you scrape the paint? Did it not scratch the mirror surface?
ReplyDeleteAmazing how the mirrors look!! The step by step is perfect for me to go by...though I need to shop for more mirrors!! I so wish you were my neighbor.
ReplyDeleteThis looks incredible, Lynda. Bravo! And I agree with Monica, I wish you were my neighbor! :)
ReplyDelete