Showing posts with label painting. Show all posts

Catching Up & Spring Home Updates

Once again, the (new) year seems to be flying by! It feels like just yesterday I peeked out the windows to see winter grey, and today, the view is filled with blue skies, green buds, birds, bees, butterflies, and flowers! I truly love this time of year, and especially now living in a place where you can really see, feel, and appreciate the change of seasons. And with the change of seasons, comes a few in home changes over the past three months, including:
  
January - Winter Paint Projects (objects)
- Mirror Makeovers
- Trunk Revamp to Stripes
- Ebonized Dining Table
- Chandelier Update
- Emerald Buffet Makeover


I'd like to add ribbon trim to the shade, but in the meantime, the white candlesticks are painted antique gold.


February - Spring Cleaning Began
- Window Cleaning
- Window panel updates (DR, MBR, LR)
 - Wall Decor updates - Created an Abstract Painting
- Changed air filters
 - Kitchen & Bathrooms deep cleaning
- Closet purge = donations + consignment
- Closet organizing
 - Home Office purge & cleaning


March - Pre-Spring Projects
- Outdoor wicker cleaned & painted
 - Phase 1 outdoor living spaces - after winter clean-up
- Front Door Re-Painted (black gloss)
- Interior black door & white moldings (+fireplace) repainted 
 - Finished basement primed & painted
- Layering of Spring florals + greens (both faux and real)
- Guest Den Refresh - New daybed refinished
- Sheets & Towels renewed
- Brass & Silver polished
- Created New Spring Tablescapes


The satin black door was already fading - refreshed with two coats of (Glidden)  high gloss. 


The key to a crisp edge paint job is an angled brush.


The finished basement & bathroom were blah-builder-beige (since 2005!!) Easily  updated with Behr Gentle Rain - same color we used in our Master Bed / Bath and Guest bathrooms - keeps house cohesive, updated neutral, and still light enough for a basically windowless space. 


The metal Daybed I ordered was Oil Rubbed Brown - it wasn't available in black (but I really liked its style being vintage-like) - I built some sections, painted them, and I finished building bed inside, in the upstairs guest space. 


HomeGoods gift cards came in handy to replenish guest towels, along with create a welcoming Spa Tray in the Guest Room.


The daybed is actually a trundle bed, but rather than build the low trundle, the space came in handy for guest luggage storage. The arm-less sofa bed is being consigned.


Fresh flowers last so much longer here in NC than they did in AZ - and houseplants have been a great means of fresh greens all year long...


Good 'ol toothpaste works like a charm to polish silver I've collected over time (mostly from thrifting!)


 I'll post a few other tablescapes next - this was just a quick Spring - Easter brunch alfresco set outside on the deck - The table I refinished last year.The black wicker chairs I thrifted in AZ.

Hope you enjoyed a happy Easter weekend!

Along with these projects, all done within a small budget - reusing & refinishing existing items paired with a few new additions, we've also had guests over for a get-together in February, my family visited (just last week), taking in Spring around town, Jeff's family too will be coming this Summer - and we're going to have neighbors over for grilling season - plus also get the neighborhood together to have a Summer block party. Although I don't go out thrifting as much here as I did when I lived in Florida or Arizona, I've still managed to keep turning Harmon House into a home with a few shifts plus reselling items no longer in use via two local consignment shops.

My mom & aunt visiting for the week.


Chef Jeff preparing our good Friday fish meal...

Since I've taken a little break from blogging, most of my sharing has been with project updates via Facebook, Instagram, and Flickr (just quicker to still keep in touch). I need to share more details about some of the makeovers & paint projects here on the blog - but I really just needed a break from blogging. Of all the social media channels I share on (FB, TW, IG, G+, Houzz, Flickr, Pinterest), blogging by far takes the most time, has changed so much since Pinterest, and I was seeing the least return for the time invested. After spending so much time online, I started to get, RSI - Repetitive Strain Injury (hand, forearm, neck), and weight gain from not moving around as much as I used to. After being 115lbs. for most of my life, I shot up to 144lbs. Thankfully, now I've dropped down to 133, but being only 5'2", for me - that's still too high - not to mention, my blood pressure was some ridiculous sky-high numbers). I'm sure moving (to AZ and now to NC) has also placed on strain on motivation (major life change), but after now living back east for a little over a year, I'm starting to feel more settled &  grounded again.

Sitting IS the new smoking - GET UP and move around.

With Spring in full swing and April just around the corner, I'm so looking forward to getting back to being and living outdoors - especially gardening (hubs is too!) and taking walks after dinner. There are also several flea, antique and the furniture markets coming up to get out and explore - plus I made a list of local parks to experience on the weekends. Regardless of my back not being quite the same as it used to be, and as fun as blogging was when I started (back in late '09) - I can't stand sitting still anymore.

Old Winston in Spring Bloom!

Jeff's Raised Box - Vegetable Garden

I'm so ready to get back outdoors!! How about you?

Happy Spring!
Thanks for stopping by!


INDOOR WINTER PAINT PROJECTS

With the colder winter days now in full swing, including our first snowfall of the season Sunday morning -- it's time to focus on indoor projects. Before diving into several projects running through your mind, it's good to start a project list, especially room by room, and tackle each space / project over time. Along with giving the kitchen & bathrooms a deep after holiday cleaning, plus reorganizing closets that became disarray during the holidays, I started some small painting projects - one of which is a simple mirror makeover...


Since paint is the easiest, least expensive and most effective means of getting the biggest bang for your buck, reusing leftover paint you may already have is a sure way to create a transformation using zero dollars. Another means of stretching your paint makeover dollars is purchasing sample jars of paints - especially when they are on sale. One of the colors I had when I lived in AZ and used to whitewash walls and makeover accessories was Clark & Kensington's Vanilla. Since I couldn't pack and ship liquids when we moved, I've been slowly building back up go-to my paint assortment - again including C&K's vanilla, here I used to transform the look of a basic round mirror I have in the dining room...

Here is what I used:
  • Wide frame round mirror (clearance find at Garden Ridge 2013)
  • 1 drop cloth (folded on table for extra protection)
  • 1 Chip brush
  • 1 small sponge stick
  • 1 small detail painters brush
  • Clark & Kensington Vanilla (sample jar from Ace)
  • Ralph Lauren antique gold (had from last year - qt. from Home Depot)
  • Ebony stain (picked up a qt. for $2 last year at a local builder supply store)
Here's what I did:
  • Covered the well-lit kitchen dining table with the drop cloth.
  • Wiped down the mirror with a damp cloth (to remove dust).
  • No tape needed - I just gave two coats of vanilla to the center wide band.
  • Sponge wiped the edge + inner rim with the RL gold paint.
  • Detailed inner rim with the ebony stain, which allowed some of the existing burnished gold to still come through.
That's it!


old basic round mirror

rough brushed wide rim with vanilla

 after 2 coats of vanilla, painted edge + inner rim with sponge in gold...


Yes - I love my black, but for Spring & Summer, I love to lighten up!

Besides renewing the mirror with white & gold, I'm also refreshing the dining room with a major dose of green, white and gold. If you've followed me over the years, you know I also love are shades of green  and my beloved palm fronds - which even though we're back east, have been hard to come by - especially during the winter months. What to do when you you want to surround yourself with a atmosphere you love? Create it yourself...

Here's a sneak peek of another paint project I'm working on inside, to not only refresh the dining room, but also update a console I scored from thrift & refinished back in FL in 2006... again re-using existing pieces collected over time, injecting color with paint sample jars, and layering in a new palm print pattern with existing textiles...


Color inspiration from Carolina thrift finds - vintage creamer, gravy boat & books...


Sample jars - on sale for $5 at Sherwin Williams - perfect for small projects such as painted furniture makeovers...


Collected inspiration from a design book (surprise! NOT Pinterest!), framed photograph wall art (I created back in FL in 2008), fabric samples old (lattice) and new (palm print - banana leaf) 

Since the room foundation is already neutral (grey walls called Porpoise from Behr paint) with white trim & dark wood floors, it makes creating seasonal changes super easy - and without the cost of a major renovation. Ideally, I'd like to cover the top portion of the walls in grass-cloth and add moldings below the dado (chair rail), but those changes can't quite fit in the budget at this time - and that's just fine.

Here are a few projects from the past where I've also used palms, greens and whites...


What projects are you up to this winter?

Thanks for stopping by!


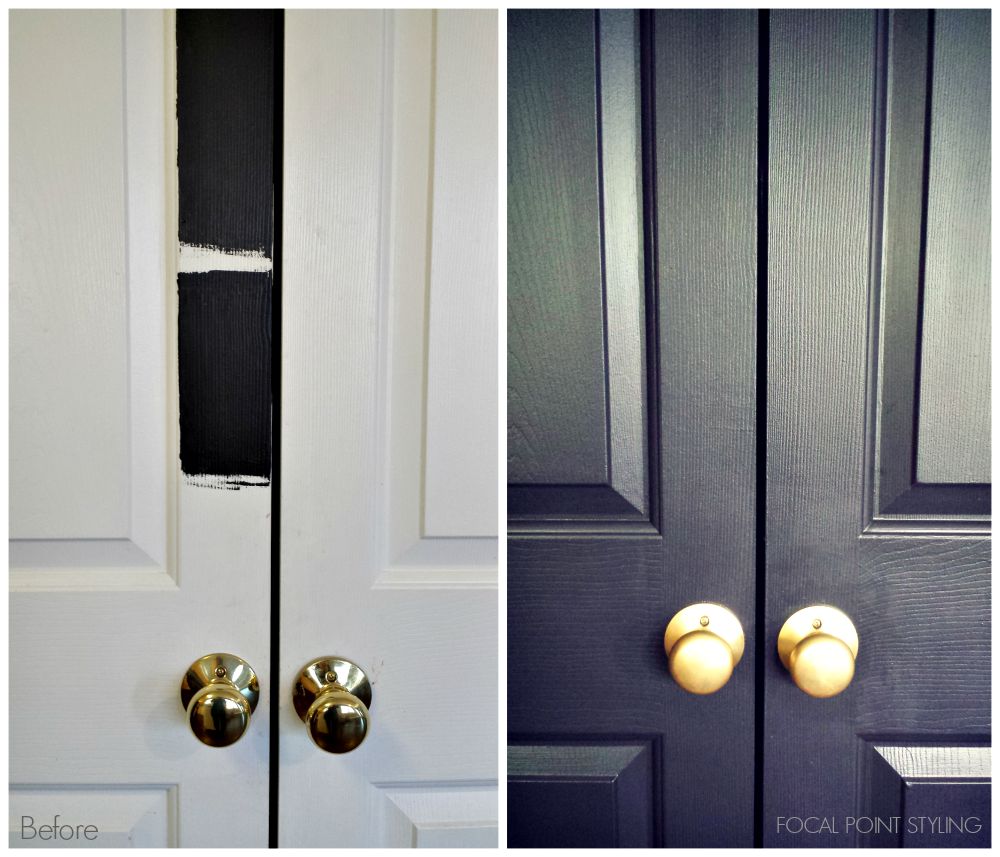
How To Paint Interior Doors Black & Update Brass Hardware

Fall is just around the corner, and for some, that can mean not only a change of season, but also wanting a change of scenery in the home. One way to create an updated look in a home is by painting your doors classic black. It's no secret: I love black! I love to wear black, my office used to be black, and when we lived in our Florida town home in 2010, I first started experimenting with painting doors black (read my post here). Although that first door was only the interior of the front door (because of HOA), I instantly fell in love with the transformation the black door gave to a builder basic white door. When we moved to Phoenix, and found a house to rent, I applied my love for black doors to our kitchen dining area, to help update the space + create more harmony in our rental home. Having white doors in an area with cherry kitchen cabinets, charcoal walls, and black appliances was just going to be too choppy (read more in my post: renters painting tips). Although I really wanted to, I refrained from painting all of those doors black, since we were renting. Fast forward to the home we bought November 2014, and one of the first tasks I did before the movers arrived was to paint all of the doors black - and wow, what a difference it made!


Satin black doors, satin brass hardware, updated light fixture, a runner, and a small entry vignette all ways to update a builder basic entry...

 Builder basic blah before...


Painting white doors black can become a tedious (and boring) project, but it helps to break it down to smaller paint projects - for example, paint doors black by 'line-of-sight' sections. This way, if you get side tracked by another task, you won't have one white door next to a black door in the same room. It also helps to focus on painting the door fronts first, and come back at another time to do the inside, because you may want to keep the backside white (for example for a pantry, powder room, or a small closet).


I did this, and I think this Fall, I'll go ahead and paint the backsides black (living in a space does that!). As for the door moldings, I'm contemplating whether or not to paint the white door casework black (or grey in the master) like the dark doors as well. I do though like the way the white relates to the baseboard and crown molding. Another option to consider with painting base & crown moldings is painting them the same color as the walls - but gloss. Chances are though, the next buyer here will prefer the white moldings too.

The one door in the house I did not paint black was the french door coming from the living room, opening to the backyard deck. All of our window mullions are white, and since I treated this door as a window - to give the fireplace symmetry, I framed it with window panels - I kept this door white. I love my black, but I'm not about to start painting all the white mullions black. Although I love that look too - the next person who lives here may not. This area is relatively conservative. And if they do, that leaves a project for them to personalize their space with.


When we changed the exterior door locks, we went ahead and purchased a more updated (transitional style) exterior door handle in an antique brass.


Also when we moved, I renewed our faded black exterior front door in an exterior black satin. Inside, I went ahead and painted the front door a satin black as well (along with the stairway railing & newel post!), but I think for Fall, I'm going to refresh the door - inside & out with a gloss black. Inside, the black gloss will help reflect more light in a small space, and outside, it will give a more sophisticated curb appeal.


Walls - Behr Porpoise (eggshell) - Trim semi-gloss white - Time to paint the doors black!

Black door painting - tape off hinges, and if you're keeping the hardware, you can just cover with foil if you'd rather not remove (but it's much easier to paint removing door handles!!) 

Painting Black Doors
Before - During - After

This house was built in 2005, so it was already starting to feel a little dated with the builder grade white doors, especially paired with the yellow-base polished brass door knobs. In the Florida townhome, we had updated all of the door handles to nickel levers, but I knew I didn't want to go the silver route here - not to mention, changing door hardware can start to become expensive, especially when it's for 14 doors in a house. Since I was painting the doors black, I tried something with the existing brass hardware - and it worked!


 Brass:
Dated & Polished (left) - Updated & satin (right) 

Updating brass hardware - from dated yellow & polished to brushed & updated satin finish.
No paint - No chemicals. Just sandpaper!


By simply taking one of my (fine) sanding blocks (I've used for furniture refinishing), I was able to buff off the dated yellow shine from the existing door knobs, and created a more matte, brushed brass - satin finish. This not only saved us the expense of changing the hardware, it also helped to salvage the existing hardware -- without any chemicals or added expense (other than buying another sanding block for under $5!)

So as my husband patched and sanded wall holes + painted Kilz in all of the closets (good germ killer when you're first moving in!!), and the painter we hired was painting the common areas of the house (LR, DR, Kitchen, hallway, stairway, master bedroom and bathrooms), I started my black door painting, and brass hardware update, along with painting all of the door casing and baseboards a crisp white.


The brushed brass door hardware also worked with the master bedroom doors I opted not to paint black, but instead I painted a darker grey. Out master bedroom has three doors (plus a pair of 15-lite french doors we added) which with our existing black furniture would have been WAY too much black in one space. the darker grey I used for the bedroom doors, I also used when I painted the existing 2 old oak bathroom cabinets (I'll share more about in an upcoming post!)


The hallway upstairs has another six door, two of which are a pair of bifold doors for the laundry closet. All are painted black, and I continued doing the satin finish brass hardware upstairs, except for the laundry closet doors - They originally had plain painted wood knobs, I replaced with a antique pair I picked up on our trip to Atlanta earlier this year (great souvenir!) 


Doors are updated - now just need to update hall light fixtures & floor covering!


For previous black paint choices, I've just grabbed any pure black paint I could find - But this project was going to be pretty big (12+ doors!!). I wanted smooth, strong coverage, with easy clean-up at an affordable price, and Behr paints fit the bill (not only for the doors, but for painting our entire home!)


Interior black door paint - Black Suede - Satin finish
Exterior black door paint - Black Suede - Satin finish
Interior grey door paint (master bed & bath)- Behr Marquee - Magnet - Satin Finish
Sandpaper block grade - Fine 


Paint is not only an economical means of updating the look of a home on a small budget, but using black paint, on doors, helps to give an updated and sophisticated look to a home. Consider painting your doors black if you are:


- Looking to refresh your home before the holidays.
- Seeking a more updated look before selling your home.
- Relocating and want to remove the builder grade style of your new dwelling.

And to really take classic black doors up a notch, try a high gloss black for your front door, inside and out! (which is on my 'to-do' list for Fall!) Think of high gloss black as adding a black patent clutch or pumps to your LBD!  


Hope you are inspired!
Thanks for stopping by!


LinkWithin

Related Posts with Thumbnails