

I measured & cut rectangles of the pattern I liked...

from the pile of free fabric samples I had...

to make a new focal point in our refreshed dining space for Spring.

The rectangles weren't going to be large enough for the existing matt, so I thought I would use some placematts...

I was going to spray them gold - but the placematt and the fabric would have been too thick together. I needed something thinner - so after cutting the pieces, I went to hunt for an old calendar I thought might work.

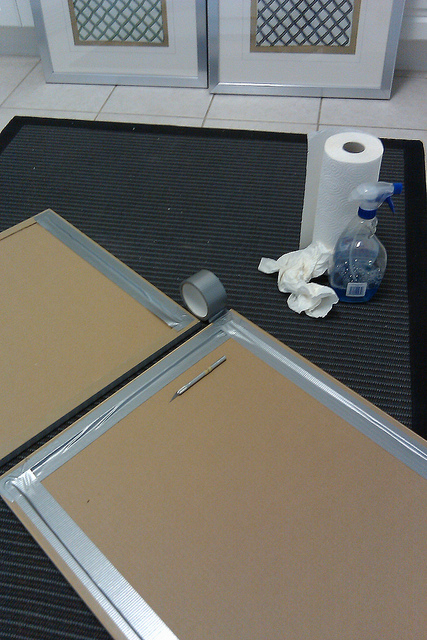
Other tools you'll need: A straight edge, a utility knife, an Xacto blade,
foam tape squares and some good old duck tape.

My old NYC calendar - still keeping some pics to frame...

The calendar paper would work - it was too large, but
that would give fresh clean cuts after painting...

The fabric was just a smidgen too small,
but the gold painted card stock would solve that...

I used drop cloths in the driveway on a sunny day
to do a quickie spray paint ...

After spray painting the card stock (or you could use poster board) I cut it to fit on the matt - it also added a layer to the framing. I choose gold to pair it with silver frames to show a more modern metal mix in my refreshed space.

Before lining up the matts in a row on the floor, I numbered their backs
and the backing of the frame they matched.

I frequently use the kitchen floor to lay out projects on...

Kitchen floors make great working space for projects:
It's an open area with good light.

I had spray mount backs of card stock out in the garage
(TIP: lay on newspaper to avoid sticky over spray on your garage floor).

Lay the cut fabric onto your layered matt and
place foam tape squares to their corners to attach & secure fabric.
When I was ready to put matts back in, I cleaned each one and checked for any "Sephora" hairs before sealing their backs with the duck tape.

Gotta love her! =)

I used the Xacto (or use a utility knife) for clean cuts of the tape.

Flipped to double check the arrangement and made notes
of measurements for mounting them to the wall.

I used a yard stick and a level to line up my holes & make a grid.

I added double face tape on the back corners to ensure they'd stay straight!

I finished the look of the mixed metals in a dining room with some thrifted brass pieces. To make smaller brass taper holders more substantial, set into glass hurricanes. I added green moss (found on clearance at West Elm after holiday) to layer in shades of green for spring. The two brass wall sconces (also thrifted @ $8 for the pair) relate to the gold detail in the frame and flank the new focal point.

While thrifting this weekend, I found some round frames I want to paint and put to surround the sconce back and make it larger - it gets lost in the ferns =)


The trellis-like pattern helped give an outdoor garden setting to the space for Spring.


Still want to paint the table black.
Over the weekend, I met up with Jose, and he gave me some sewing lessons and helped me to make a slip cover I had been wanting to make for our black leather bench. More about that coming up shortly - so stay tuned!
Happy Spring!

SPECIAL THANKS TO :
for graciously featuring this project on their blog!
LINKED POST TO:


So pretty - you are right that the trellis design just adds to the overall spring quality of the room.
ReplyDeleteThey look so great! Fantastic idea! I love to sew myself but I often come across fabric I love to much to use and showing it off in a frame would be a great idea. Thanks!
ReplyDeleteWhat a beautiful room and wonderful artwork idea. I love the fabric, and seeing different colors of the same fabric put together like that is a really striking look!
ReplyDeleteVery nice! I always like a good old no sew fabric project!
ReplyDeleteSo very beautiful and fresh! Can't wait to see what you do with the round frames. I have 2 round frames... waiting to see what you do with yours ... perhaps I'll copy your idea. :-)
ReplyDeleteSheryl aka flitteringbutterfly@hotmail.com
I love it -- and I love how to make it work - fabric is a little short, so you come up with a great, stylish solution!! That is just the kind of idea that inspires me...
ReplyDeleteReally nice! Great job. :)
ReplyDeleteI can't believe how much I love the lime green color in that room! Excellent idea and very thorough tutorial as well! Glad to find you. :)
ReplyDeleteThis looks really great! Thanks for the great tutorial.
ReplyDeleteLooks fantastic. Love the material you picked. Just perfect. I have been debating about creating a wall space like this as well. I can't decide if I will use scrapbook paper or material- or even both. Now to find me some frames. Love it!!
ReplyDeleteYour arrangement looks fabulous! I love the trellis pattern you chose to frame - I have been looking for interesting fabric to do this with for my foyer, but love the trellis effect! Thank you for solving my dilemma of what kind of fabric to frame!
ReplyDeleteThis is fabulous, so are you, so is your blog! You'll see this featured on my blog (as well as another blog that shall not be named that I work for...shhhh. :)
ReplyDeleteI love it! Great job! What size frames did you use?
ReplyDeleteRebecca
Just another thought to add to my earlier comment... Your readers may find it helpful to use the back of fabric to have the co-ordinating fabric. (sometimes works well) ... Love your blog! :-)
ReplyDeleteSheryl aka flitteringbutterfly
Your blog is fabulous!
ReplyDeleteThank you eveyone for stopping by!! The size of the silver painted wood frames are 22"x28". They were discontinued fitting room wall art (from old job) and I had made a "LOVE" quad with them last year for Valentines. The sample fabric really helped give them a new look - using both the front & back of it.
ReplyDeleteSo Kathy - pick a season and paper for one and do the fabric for another one - It's a small change that can make a big impact and help renew a space on a budget.
Thanks again for stopping by! xo
:D Lynda
I LOVE this! You are a very tallented designer/artist!
ReplyDeleteI must know... where do you get free fabric samples?
Thanks,
Jennifer
That looks great! I am loving your apple green paint. I am going for that same look using a periwinkle. I am just trying to decide which shade. I like the brighter but a little scared of it. But I'm also going to paint my table top black and use black and white accent.
ReplyDeleteThanks for the added inspiration!
Girlfriend! I LOVE this idea! BRILLIANT and BEAUTIFUL!
ReplyDeleteI would LOVE to have you link up to my PARTY! WHASSUP WEDNESDAY!!
And I have a party button you can grab and put on your blog so your friends can come too:)
*ENTER LINKY PAR-TAY Here! *
xoxokara
Wow, this room looks amazing. I really love that fresh green color!
ReplyDeleteWarmly, Michelle
That is one brilliant idea! They made your place look elegant. Simply beautiful :)
ReplyDeleteHi - Where did you find these frames?
ReplyDeleteThis is so beautiful!!!
ReplyDelete