Showing posts with label merchandising. Show all posts

CELEBRATING OLIOBOARD - ITS MANY USES + TIPS!

It's hard to believe, but the moodboard maker site called Olioboard launched four years ago this month! At the time, it was one of the only online moodboard makers - beside Polyvore & before Pinterest - where you could creatively pull together thoughts, ideas, and concepts for room designs, party planning and even fashion. Its primary use today is for interior designers, stylists and stagers to use the site for creating 2D and 3D room plans for their clients. Even home enthusiasts and DIYers can pull a look together for a makeover, or even retailers have used the site for pulling together trends. The depth of details on these boards have changed - A LOT - since the site's launch. Everyone in the Olioboard community has learned from each other, from sharing concepts online in Twitter feeds or emails and even joining a member administrated OlioboardFanRoom on Facebook. Four years ago today, Holly Becker of Decor8 had written about Oliboard's app for Real Simple. Although I didn't join in June of 2010, I did manage to find their site in July 2010 (see Creating Online Moodboards at Olioboard.com) where since then, I've been a loyal fan of the site.  I've even had the chance to meet the co-founder, Sheilah MacSporran at the Design Bloggers Conference, plus I've enjoyed joining a few of the many design challenges and sponsored contests the site has offered over the years. Here are a few of the latest boards I've been able to create on Olioboard, plus a peek back at a few firsts and some of Olioboard's game-changing applications and uses...


The two above 3D boards are the latest boards I created, and add into a design challenge at Olioboard, where a member suggested designing a room inspired by blue & white porcelain. You can add an existing board you've created (as I did here) or create a new one from focused on the challenge criteria. Both of these boards I did were inspired by mixing my love of the beach with my latest decor obsession of blue & white. This particular design challenge is a voters placement + award badge, unlike a retailer sponsored contest...


One of the last retail sponsored contests at Olioboard was not only voters choice to place, but 5 products from Hayneedle also had to be used in the board designed with an outdoor space in mind. After the Top 50 boards qualified, judges Lori Dennis and Kelli Ellis selected their picks for Top 3 boards... Thankfully I placed in the Top 3 - and we all won a ticket to attend Design Camp this summer at LVMKT. Since I'm attending as a guest, I had held giveaway on my blog, to giveaway my winning ticket to design camp - and the winner of that giveaway was Laura C. Moffatt!

CONGRATS LAURA!!

You can see from the above boards of today (shown above) that time and practice helps to develop your skill set on Olioboard - but not all boards are 3D room designs. When I first started on Olioboard, I first experimented with sample board layouts (you can see below) - showing only the items I would use in a designed space...


These types of 2D boards are great for homeowners to get an idea of colors and textures that can be used in their space. Eventually, since you can upload any image to your Olioboard library or sets, I used Olioboard as a means of pulling together "Concept To Completion" boards as well as before and after boards...


 Olioboards can also be a great visual tool when working with a client. Both 2D and 3D boards can pull together the look of a project, and also be printed to organize in a project binder. When the online boards are printed into a binder, it becomes a "go to" tool because within that binder you can also keep fabric samples, paint swatches, product info sheets, and most importantly: the correspondences and receipts from the project...


The Olioboard site can also help stagers or homeowners who are selling or planning to move - since you can create a virtual staging of a vacant space (read: How To Use Olioboard For Online Home Staging), or even merge together floor plans + exterior photographs when house hunting...


 For bloggers (or retailers), Olioboard can become a means of creating online content (see Kids Room Design BlogHop) from curating trends or merging fashion and decor onto boards (see blog link up Passion For Fashion - Spring Fashion & Decor) to even planning your dorm room (see Dorm Decor - Planning Your Residence Hall Space) - all ready to share from the Olioboard site via Twitter, Facebook, or Pinterest. Or you can download your boards, save to your computer and further enhance your boards via online tools such as Picmonkey, where you can add frames, overlay your logo, add text, create covers (ex: for Facebook) or even convert your room board to black & white. Boards uploaded to Picmonkey can also create even more pinnable (vertical) content to share on your social networks - a great way to market your brand OR create marketable content for an event...


Here I just used my logo, but you can add whatever text you want to communicate - Try different arrangements and test different layouts to see what works best for you. 

Here are a few tips I've learned over my time using Olioboard:

1. Make use of creating sets within your library it will help when you're saving new items or when you're looking for something specific for your board (for example: your logo, plants or blue chairs).

2. The take time to learn the editing tools - eliminating the white background is great, but make the image stand out when it's layered vs. being transparent.

3. Think mobile device when building a board - white space is your friend - not every surface needs to be covered as a real room might.

4. Utilize 'tags' on the site - This helps with searchability not only on Olioboard, but in Google (images) as well. For location, add your zip-code as a tag with key words such as "Interior Designer", "Interior Decorator" -- great to use if you've recently moved and you want locals (over time) to find you.

5. Speaking of Google searchable images: when saving your Olioboard, add either your name, your company name or your blog name in the image description on your computer. Again this helps your SEO. For example: Google search your name - afterwards, click "images" and see what pops up. Your boards can pop-up along with the photographed work you've done, whether it's on your blog, or another site featured, or pinned to Pinterest.


Olioboard recognized by  Mashable
"For aspiring interior designers and overall design enthusiasts, Olioboard is an easy way to communicate complex artistic concepts visually. Use it as a brainstorming tool or simply to visually organizing thoughts." - Mashable


What's next for Olioboard? This year, they are branching out to test the waters of further merging online designers with some of their site's top selected retail brands to help consumers shop - A great way for students to get started in the industry plus a great means of retailers teaming up with industry tastemakers to curate current trends for them, while having a chance of making a little extra cash.


https://olioboard.com/users/nyclq 
 plus see a collection of my boards in the tab above: Roomboards


Personally, I'm grateful for the site having been developed. I could sketch 3D, draft and render, but I had the hardest time learning CAD. Working with a site such as Olioboard has helped train my brain and hand to computer aided design - and it's so much faster to do a quick change to a plan or create plan A, B, C to choose from - by simply hitting "Duplicate" board on site - make your changes and presto, new board.


Have you tried Olioboard? 
How did you like it?
What have you used it to help you create?


Thanks for stopping by and Happy Birthday Olioboard!


FOCUS ON: Closet Organizing Part III For the Gals

Grab a cup of coffee and get comfy! Continuing from my (click to read) Part I and (click to read) Part II of Focus On: Closet Planning & Organizing, here are more details and examples to help you organize the closet you already have. I'd have to say, plan on it being a weekend project - especially if the closet you're organizing hasn't been sorted in a while. I'm using my own closet + experience as an example - but the "eye candy" closets will be at the end of this post. Hopefully these tips can also help if you're relocating from a larger walk-in to a hall split closet layout (meaning now two). The tips can also help if you have a shared closet situation with your partner. Regardless of the size or budget however, the keys to focus on are the same: vision, plan, sort, purge, execute, categorize & colorize.


SHELF UTILIZATION
Closet shelves are good to be used for the bulk of the folded apparel items, for example:  jeans & tees in one section. Shelf sections are also good to dedicate to handbags and shoes. Seasonal shoes are great stacked in totes (to prevent dust). More frequently used shoes are good to have nearby, usually on shelves towards the bottom of the closet. If shelves aren't available, stacked cubes can be an alternative. Two 22" x 11" cubes stacked can fit 6 pairs of shoes + utilize the top for additional pairs - just turn shoes heel-toe for that extra space. Another alternative for everyday shoes is for something out of the closet: Try using cubes or baskets in the garage, in the mudroom or at a secondary entrance. This is great for those everyday flip-flops or sneakers that are also potential germ traps you don't necessarily want to bring into your home. For all those other seasonal or special occasion shoes, totes are great and can be stacked on top shelves in closets. Labels or even snap shots placed on the outside of the totes can help you recall what treasures are inside. Longer boot boxes can be stacked under dresses (yes - even maxis) or neatly tucked into a corner in your closet.


1. Short + LS tees 
2. Printed Tees 
3. Bin-box w/black + grey clutches
4. Short sleeve Tees
5. LS Tees
6. Frequently used bags
7. Knit pants (yoga, biking, exercise, painting)
8. Jeans
9. Metallic clutches
10. Frequently worn shoes (ex. bottom row are now wedges)
11. Summer straw totes - In winter: boots.
(On the right side wall, I used a keys plaque with 4 hooks to hang a few belts.)


A-MAZING how all that "stuff" fits into a few wardrobe boxes for a move...
Well, at least the hanging stuff did - lol


What doesn't fit onto a closet shelf, is sometimes better utilized in a chest of drawers or dresser... For example: my tanks & tunic tube tops are in half folds in a drawer. Jeff keeps his shorts half folded (length wise) in his dresser drawer.


HANGERS
Keeping hangers all the same  (at least in a section) is key in keeping the organized look of your closet. A space saver hanger style to use are the thin velvet hangers. Personally, for years, I had only jumbo hangers (all in black) in my closet. But after redoing a closet for a client with skinnies in brown (to coordinate with her bedroom) I too have made the switch to skinny - black of course :) - hangers. Yes, they not only do save space on your rods or hanging space, but they will save you time + aggravation + save your back from picking up fallen clothes on the floor. Since you've already purged and sorted folded clothes in storage totes or bins (see Closet Organizing: Part I), it's easy now to take an inventory of how many hangers you need.  Just physically count what you need to convert - and buy 12-24 additional hangers to have handy for closet growth. 


ABOUT OUR WALK-IN CLOSET | FL
In our FL closet, I kept clutches in a tote - but now I have a few more so I repurposed 2 black photo storage boxes for them to stand in. My heavier winter scarves & gloves were (still are) in a clear tote (under dresses w/sweaters & boots). My black hangers were just jumbo in FL before I switched to skinnies here in AZ. An over the door towel bar from our master bathroom is now repurposed on the back of the closet door for items to grab quickly like a cadri or a robe.  Scored velvet hangers back in January at the grocery store: Under $10 for a case of about 60.


MAINTAIN
Yes, a good rule of thumb to KEEP your closet organized is for every new item in, donate an item... But let's be honest - that doesn't always happen. What should always happen though is a minimum of once to twice a year, review your wardrobe and continue to donate. Usually - if those "extra" hangers are gone, it's a good indication it's time to purge :). 


Small closets get even smaller once they fill up -
Maximize the space with sorting and organization!

LOVE having laundry sorted in ready to go totes 
to take downstairs to the laundry room on Saturday morning!


Another space saver to utilize in your closet (if you have the space) are laundry bins. One large basket is fine - but an easy way to keep your laundry sorted is using canvas laundry totes. A single unit can come with three totes: One for whites, one for darks, and one for colors - unless you need space for dry cleaning (for example shirts for he hubs).


Arizona closet - Section 1 in hallway
 Utilizing a closet extender rod helped maximize the space.
(I think I've had the extender since I was 18!!) Keeping patterns grouped together within sleeve length also helps avoid a messy looking closet.


DRESSES
Besides sorting sleeve length and color, dress lengths need to be considered. Maxis can take up the bulk of this hanging space, which is why it's ok to fold over a few on your skinny hangers - especially for the strapless or halter ones. Another option to hanging strapless maxis is to use bottom hangers with clips. Although you can buy them, sometimes you can also acquire some from retailers - just keep them all the same color (clear or black). Keeping like hanger styles together also helps with the neatness of the closet, so skirts and/or strapless sundresses are great to keep altogether tucked in one area of your dress section. Then if you want a dress or your feeling like pulling together your own look with a skirt, they're all grouped together for you.

Can you tell? I LOVE BLACK and I LOVE MAXIS!
Arizona closet - Section 2 - Behind the door of walk-in.
Taking the heavy + bulky clothes downstairs to another closet for the season helped with space... to be switched back in the Fall. Although my lifestyle has changed, I still do have some of my "work" dresses also downstairs in the seasonal closet.


HANGING ITEMS
The key to organizing your hanging items in your closet is sleeve length, sorted tops from bottoms and COLORIZATION. To maximize hanging space, especially in a single rod closet, I highly recommend using a closet extender: Two vertical hanging brackets supporting an additional horizontal rod. What fits best? Usually jackets on closet rod with (short) skirts and folded over dress pants on the closet extender. Leggings can also be hung - 3 per hanger. After the double hung section, hang blouses and tunics. Underneath them is a good place to tuck those storage totes of seasonal goods (like boots or sweaters). If you're a dress-aholic (like I am) you may need equal space of these items combined for dresses. Another item that is great hung are scarves and wraps.


SCARVES - WRAPS - BELTS
If you have several pretty pashminas or wraps - stay away from folding them or tucking away in a box. You'll get more use out of them if you keep them hanging by color. Nothing fancy - just utilize your closet hangers. I have seen shower curtain rings on a hanger used for hanging scarves - but I thinks they would slide too much. By hanging the wraps, I see them, so I wear them more. From time to time, I've also been known to use them in my home decor. Four hangers does the trick - sort by: neutrals, B&W, cool colors and warm colors.  For belts, hanging isn't the only option. For example, a thrifty storage solution to help organize chain belts, is to recycle small bread tins. Three can easily fit into a shoe tote or stacking drawers in the closet. Placing the belts again by COLOR: gold, silver, and those with turquoise stones - makes it easy to see and sort. Stackable drawers can also help for additional belt storage by rolling belts into the drawers. The drawers can also hold sunglasses or extra pairs of flip flops and flat sandals.


This would be a GREAT place for some shelf shrouds!!
Picture shot earlier this year - I have wedges & a few more straw totes in here now. More bags are run across the top shelf - but it's too dark for a photo - NO lighting in hallway or this closet.


SHOES & BAGS
Either before putting those boots away for summer, or sometime at the end of August is a good time to take boots to the shoe repair for a clean-up. I personally did this past year, and for $35, I had 4 pairs of boots that looked like new. The shoe repair places can also repair and clean-up your belts or bags. A shoulder strap grommet that came undone from your favorite bag is an easy save for a shoe repair place. Plus - maybe that bag skipped a fall season - but after it's repaired, it can become a new addition to your wardrobe this year. For bag storage, lining bags up like books saves space. If you have multiples of a color (ex: blacks, whites, golds) use the most sturdy bag in that color to hold the slouchy ones of the same color. Usually one bag can hold another 3 - 4 bags. Photo boxes  or bins are a great way to hold all those trendy clutches - think of them as files. Again keep by color. Some bags do just need to be hung (like a fun fringe bag), and those can be the pretty"display" bags to help glam-up your wardrobe space. And last bur not least... let's talk jewelry...


Layered wooden beads for summer jewelry also create a personalized display 
of a collection in our home.


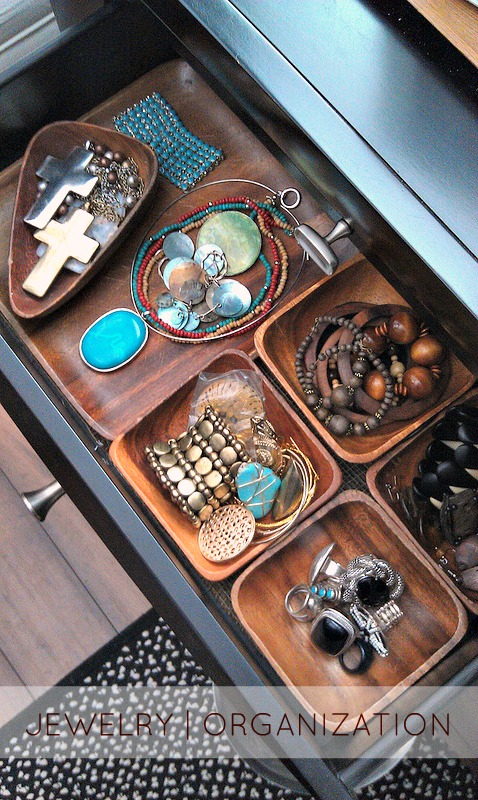
JEWELRY ORGANIZATION...
That's going to need to be another post for sure! But in the meantime, here is a peek at some of mine + quick thrifty tip (pictured above): I LOVE collecting wooden bowls from the thrift store. Since my jewelry amoire is actually downstairs (next to the form), I keep a portion of my seasonal jewelry in the top drawer of my bedside table. I'd love to have the amoire up here with me, but it would have been another bulky piece added in our smaller bedroom, and it just didn't feel right. Utilizing the wooden bowls and a tray works fine in this space. 


I keep a selection of cuffs on the chest of drawers, displayed on a candle tray (from Ikea) plus in a black lacquer box. I'll post more about jewelry organization later... Now it's time for some closet eye candy... These are (in my opinion) a "little" bit more realistic than the entire dressing room some people have (even a two story dressing room??? That can't be!) The eye candy below were all sourced on Pinterest and you can see more on my boards...


LOVING that rug! And the stacked trunks are a great solution for extra storage.

Love how packed but still neat this is - just don't care for 
the chandy - but love the space!

Another well organized small closet...

LOVE this: Organized by color!


Almost looks like a boutique in here, 
including a glass case (to right) for jewelry!


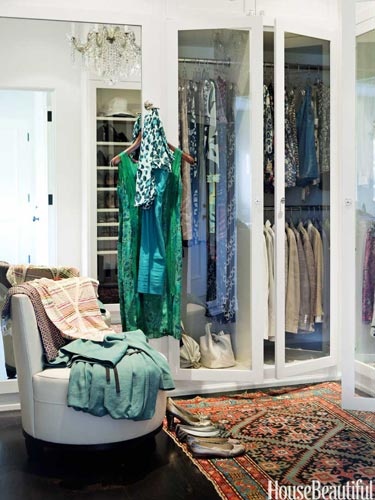
And for those who of you who do have the space for a dressing area, 
here is a piece of candy for you...


Join me at Pinterest to see more of my CLOSET ORGANIZATION pins...


 For more tips on organizing your home, click below links...

(also includes a link-list to 15 other design bloggers who discussed home organizing!)


And if you're in need of some real-room 
office organizing & planning, head over to see Kate of Dabble in Chic!


 Hope these tips help you get organized! 
It's a great way to beat the heat while staying inside!


Thanks for stopping by!


LINKING POST TO:


LinkWithin

Related Posts with Thumbnails