
PROJECT NEEDS:
3 1/2" wide molding (to cover over wire shelf cups - our only expense)
Pre-Cut to specifications at Lowes (or HD)
OTHER MATERIALS NEEDED (we had)
Leftover MDF boards
Tape measure (measure twice!)
Tape measure (measure twice!)
A Circular Saw (cut once!)
Finishing Nails
Wood Glue
Wood Filler
Fine Sandpaper
Sponge Roller
Semi Gloss White Paint
Plexi Storage Totes
Basket Storage Bins
Wooden Tray
Felt Pads
Time
Hubs off Sunday Afternoon
While I cleared out the space, hubs went to Lowes, spotted 4 molding options, sent me pics, and I replied with 1st & 2nd choices. Although the most expensive (choice #1 - because of molding length), its quality was better to work with, and VERY happy with end result. Lowes cut the molding with our measure specification.
ABOUT THE PROJECT:

THE VISION:
Utilize pantry space to hold more kitchen items (from laundry storage) and relocate non-kitchen items (ex. candles) into the Laundry room storage.

TIP: When emptying an area, empty it into the area you planned it moving to.
This helps to minimize your house becoming a mess.

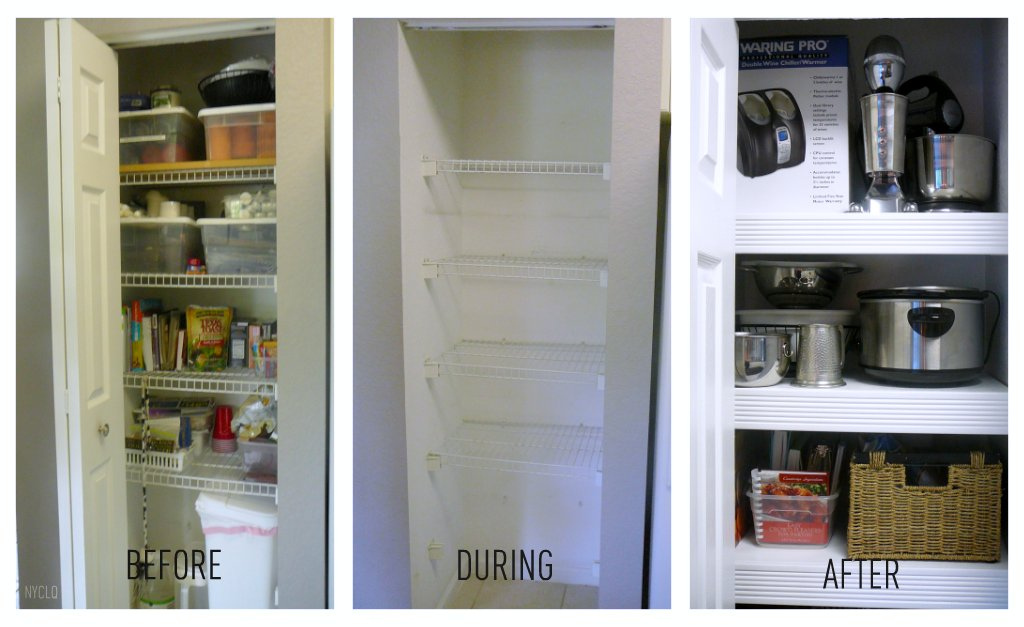
After emptying & relocating contents, remove wire shelves clean them, as well as give the space a refreshing coat of paint. We kept it simple - clean, light & bright - We just used the same white paint as the shelves - Semi Gloss White. (EZ kitchen cleanup!)

TIP: Paint shelf pieces separately outside before putting together.
Let dry well in the sun. When adding molding, run a bead of glue - than use finishing nails to hold together. Camouflage nails (or hammer marks) with wood filler, let dry and lightly sand. After shelves installed, give shelves a quick refresher coat to cover marks & clean up.
THE PLAN:
Clear out existing pantry items, and relocate items to other storage areas. Pull together items to be relocated into updated pantry. To give next homeowner the option of open storage, install finished shelving.

TIP: clean & clear the space - reorganizing items using not only storage baskets, but re-using some of the white smaller plastic baskets grouped together inside the basket.

In the end, only used one of two baskets - the one that remained has snacks & crackers - the other was all the extra white candles & tea lights I frequently use - but I don't use as frequently as table linens. I relocated place mats & napkins from a basket in the laundry room to a tray (I had gotten as a gift to make a cork display - but I've never used.) now set on the shelf in the pantry. And it's closer to where we use them daily - the bar top counter.

Baskets act as drawers, but also used clear totes for cook books.
THE EXECUTION:
By simply utilizing the existing wire shelves as the new shelf bracket - fit new shelf shroud over the top of the wire shelves. TIP: Utilize felt pads on the bottoms of storage items going back onto the shelves to avoid scratches.
STORAGE BEFORE
STYLISH STORAGE AFTER
THE STYLE SOLUTION:
Our kitchen now has a more cohesive updated look, without any major demo or reno - completed in one afternoon, and for a minimal expense. To take this a step further (for those who can afford to) the door could be replaced with a frosted glass panel door, and even replace one or two cabinet doors in the kitchen, for a more open feel. I'm so happy with this simple update - not only because it looks pretty, but it's so much more functional to our lifestyle!

BEFORE
SOLUTION TAKEAWAY TIP:
When you have a vision, inventory what you already have for the least expense and maximum results - or better yet - Inventory what you have (especially out in the garage) and come up with a creative solution to utilize it.

AFTER
NOTE: Since we have our trash can in here, the last shelf shroud was dragging on the can top. The solution: I used the excess MDF under the shelf shroud (as a shim) to raise it up, get the clearance needed, and still maintain a uniform look.

I have some other storage solutions I'll be sharing shortly... along with those amazing thrift scores I made not only for myself, but for an upcoming bedroom makeover I'm in the process of planning... so stay tuned!
Special thanks to the hubs for having a "House Proud" moment,
and helping me with this project!
Thanks for stopping by!

LINKING POST TO:

