Showing posts with label decorating with white. Show all posts

LOVE THE LOOK: PINNING CHRISTMAS GREENS

Seriously - I cannot stop pinning! Even though yes, I set our Christmas, inspired by pins I captured throughout the year... I'm still finding pins and saying, "Oh! I wanna do that!" For some pins, they'll have to wait until next year. But for some others, they are simple enough to do and layer into existing trim now. Someone yesterday wrote they were looking to be inspired... If you're stumped at where to start: Start with your heart. What does Christmas mean to you? What memories do you cherish the most and why? Is it a movie you enjoy, like A Christmas Carol? Is it a childhood activity you use to do like sleigh riding or ice skating? Or is it a color you're drawn to that inspires you? This year, for me, I'm drawn to the freshness of mixed greens. Probably because I did a white tree the past two years plus I'm tired of seeing dust, dirt & rocks around here. When I started pinning the greens last year, I also kept on the lookout for items like deep green velvet pillow covers (I got from Ikea in January - see blog header image) and green throws (found thrifting this summer) I'd be able to mix with some existing greens - and white shag rug + white sofa. Here are a dozen pins from my board "Holiday Inspy"...


One morning, early in November, hubs woke up freezing and walked around lighting candles to try to warm the house. That situation and this image became my source of inspiration for my "faux mantel" (I don't have a fireplace, but I do have a low profile wall unit, and a fireplace screen saver!)
Having the candles clustered together in an area makes for a stronger source of heat, plus it's easier to light or put out the candles...


I use to add garlands to my windows in my apartment, and decided to do it here this year. I pulled together pieces I had to manage to fully hang on our dining area window (with lights!) It's faux, but I also mixed in some feathery fresh greens too to beef it up! I'd really like to add the "Merry Christmas" garland swag to it.


I don't have window boxes, but I do have two galvanized tins similar to this shape, so I made two arrangements...


LoVe the mix!


LoVe the mixed greens of this wreath!
I did similarly when mixing real with faux.

I had wanted to try wreaths in the windows: I tried it, but didn't like it.
It felt too cluttered. This look works best in a space with sparse wall art. 


Such a simple detail to add to the old hacienda key I picked up in September in Sedona! And I think I have a pretty green ribbon too! 


What inspired you with your Christmas decor this year?


DECOR STYLE SOLUTIONS FOR MOM

Tic Toc... Tic Toc... Time is running out to make something for mom! If the gallery wall is too much to take on this weekend, here are two simplified, but still stylish solutions you can make for mom: One is to just print and frame nine vintage photos and create a grid styled memory statement and reading nook for mom. The other is to take some time to restyle her bookcase or wall unit with some B&W framed photos, updated accessories and clutter control.


Moms photo grid
and nook.

Moms bookcase restyle.

View from moms living room,
just past the memory wall.


When I was selecting photos with my mom to frame in her home for her makeover (and the Memory Wall you can read here), one of the categories I made was of her and my dad. He passed away back in '89, but those memories of their time together live on.  I found these really cool vintage images, from when they were dating, of my mom, my dad, her brother (my Godfather) and their cars I thought would make an interesting statement...

MOM'S PHOTO GRID

Images of mom & her brother...

Mom & dad...

Dad's car...

My my mom's brother (my Godfather)
and my dad.

Here's what I used and how I made the wall grid:


~ Scan vintage photos
~ Edit to make images sharper
~ Edit more contrast for B&W


~ OR choose a sepia finish for your space

~ Use five 2 pks of 11x14 frames
(@ $6 ea. pk. from Michael's)

~ Cut white poster board (3 sheets @ 22x28)
into quarters @ 11"x14" each

~ Print & cut photos

~ Center photos or place with wider margin to bottom and attach photo to posterboard with double-sided photo tape

~ Clean glass / close frames

~ Use a yardstick, a level and a pencil to mark your grid

~ Hang frames & secure lower frame corner backs to wall
with double-sided foam tape (to help prevent movement)


 Create a nook or vignette for mom by using her favorite chair, an ottoman, a throw &  comfy pillows, a table, a lamp, and a basket full of magazines - or hang you grid in a spot in her line of site from another place in the room.

MOM'S BOOKCASE RESTYLE


Within this same space, I used the other category of photos: My mom with her immediate family - her mom, dad, sisters, and brothers. Using the same technique, scanning and converting to B&W within this same space, I used a mix of metal and wood frames to re-style her bookshelf with.


Unit after update.

She LOVES shells, candles and books. I color-blocked what books she had, but turned them in reverse for texture and also used them as risers on the shelves. Helping to clear away years of clutter, but still have keepsakes within reach, I used a collection of chocolate & black baskets I picked up at Marshalls. She already had tons of shells, so some simple glass cylinders added some sparkle to the bookcase, and helped keep moms collections separate.


Unit during:
Cleared clutter, keepsakes stored in bins / boxes,  and some
frame placement to get a feel for the new look.


Frame placement first helped with deciding how many horizontal & how
many verticle images I would need to print for the frames.

Bookcase before.

My father had built this bookcase (not one of his better builds, but still a great storage piece non-the-less. Since he had built it back in the 80's, it was in need of a little update. I had my mom ask a carpenter friend of hers to simply cut back the curves, and add mouldings to the unit. When the painter came to do the living room (and continue the color in this conversation space off the kitchen) I suggested she keep the color the same. But to help with lighting in the space, the wall unit was painted a semi-gloss white.


Fresh paint, moulding, hardware and a few updated accessories was all this piece needed to take it from sad to fab. During the holidays, I add in some simple silver sprays / picks to add a little sparkle, but without over doing it. The simplified style of the bookcase has made it a little easier for mom to maintain.


Hope you enJOYed these simple style solutions I made for my mom...
I'm not a mom, but I do hope if you are, you enjoy a
HAPPY MOTHER'S DAY


HOPPY SPRING BARGAIN BUNNIES

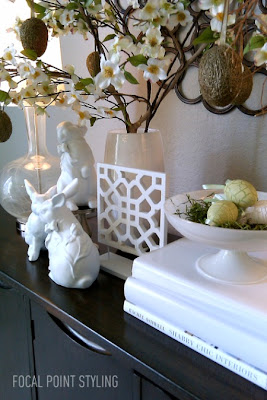
Hope you enjoyed a great project filled weekend, or just spent time with friends and family. Although I didn't work on any major projects over the weekend, I did attempt a few DIY's and crafts last week. One of which was refreshing some thrifted bunnies I found two weeks ago - at a bargain of only $3 each. Now I'm not all into decorating every surface for Easter, but these made a simple addition to my existing Spring vignette on my buffet at our entrance...


This simple add was only $9.


I've seen similar white bunnies priced at $10 each at HomeGoods to $39 at Pottery Barn.

POVERELLO THRIFT - Wilton Manors
Ft. Lauderdale, FL
I spotted these hares mixed in with some other Easter goodies while checking our a (new to me) thrift shop up in Ft. Lauderdale. I felt like I had hit the Easter decor Lottery. I'm guessing a store must have donated their merchandise - more about that later - now, back to the bunnies...


Cute, but I left him there for another thrifter =)

He's so "hoppy"!!! =)

Minus the roses & bow and this bunny's got potential!


Brought them to their new home...

After cleaning them, took them outside to be primed & sprayed...


Priming helps even out the surface & existing colors
(so it doesn't fight the white)


So cute!

White satin spray gave a refreshed coat...


And I used a pillar holder to give height to the trio's composition.


The thrifted pedestal bowl (from back in Fall) did have green apples, which I switched out for some green grass (I found on clearance for $3 at West Elm after Christmas) and I added some simple dec eggs I picked up at HomeGoods back in February (pack of 16 hanging crackle eggs for $5)


The bunnies could also be painted in chocolate brown, heirloom white, or even with glitter - but I like the simplicity of the white...


A simple switch in chalk - from "A" to "O"...


Hoppy Spring & Thrifting!
Thanks for stopping by!


LINKING POST TO:


Post Share Update:
 Also now sharing post to HomeGoods Happy by Design board on Pinterest


Note: Although I've shared this post with HomeGoods and the Happy By Design project, all thoughts and opinions are of my own.

LinkWithin

Related Posts with Thumbnails