Showing posts with label grey doors. Show all posts

How To Paint Interior Doors Black & Update Brass Hardware

Fall is just around the corner, and for some, that can mean not only a change of season, but also wanting a change of scenery in the home. One way to create an updated look in a home is by painting your doors classic black. It's no secret: I love black! I love to wear black, my office used to be black, and when we lived in our Florida town home in 2010, I first started experimenting with painting doors black (read my post here). Although that first door was only the interior of the front door (because of HOA), I instantly fell in love with the transformation the black door gave to a builder basic white door. When we moved to Phoenix, and found a house to rent, I applied my love for black doors to our kitchen dining area, to help update the space + create more harmony in our rental home. Having white doors in an area with cherry kitchen cabinets, charcoal walls, and black appliances was just going to be too choppy (read more in my post: renters painting tips). Although I really wanted to, I refrained from painting all of those doors black, since we were renting. Fast forward to the home we bought November 2014, and one of the first tasks I did before the movers arrived was to paint all of the doors black - and wow, what a difference it made!


Satin black doors, satin brass hardware, updated light fixture, a runner, and a small entry vignette all ways to update a builder basic entry...

 Builder basic blah before...


Painting white doors black can become a tedious (and boring) project, but it helps to break it down to smaller paint projects - for example, paint doors black by 'line-of-sight' sections. This way, if you get side tracked by another task, you won't have one white door next to a black door in the same room. It also helps to focus on painting the door fronts first, and come back at another time to do the inside, because you may want to keep the backside white (for example for a pantry, powder room, or a small closet).


I did this, and I think this Fall, I'll go ahead and paint the backsides black (living in a space does that!). As for the door moldings, I'm contemplating whether or not to paint the white door casework black (or grey in the master) like the dark doors as well. I do though like the way the white relates to the baseboard and crown molding. Another option to consider with painting base & crown moldings is painting them the same color as the walls - but gloss. Chances are though, the next buyer here will prefer the white moldings too.

The one door in the house I did not paint black was the french door coming from the living room, opening to the backyard deck. All of our window mullions are white, and since I treated this door as a window - to give the fireplace symmetry, I framed it with window panels - I kept this door white. I love my black, but I'm not about to start painting all the white mullions black. Although I love that look too - the next person who lives here may not. This area is relatively conservative. And if they do, that leaves a project for them to personalize their space with.


When we changed the exterior door locks, we went ahead and purchased a more updated (transitional style) exterior door handle in an antique brass.


Also when we moved, I renewed our faded black exterior front door in an exterior black satin. Inside, I went ahead and painted the front door a satin black as well (along with the stairway railing & newel post!), but I think for Fall, I'm going to refresh the door - inside & out with a gloss black. Inside, the black gloss will help reflect more light in a small space, and outside, it will give a more sophisticated curb appeal.


Walls - Behr Porpoise (eggshell) - Trim semi-gloss white - Time to paint the doors black!

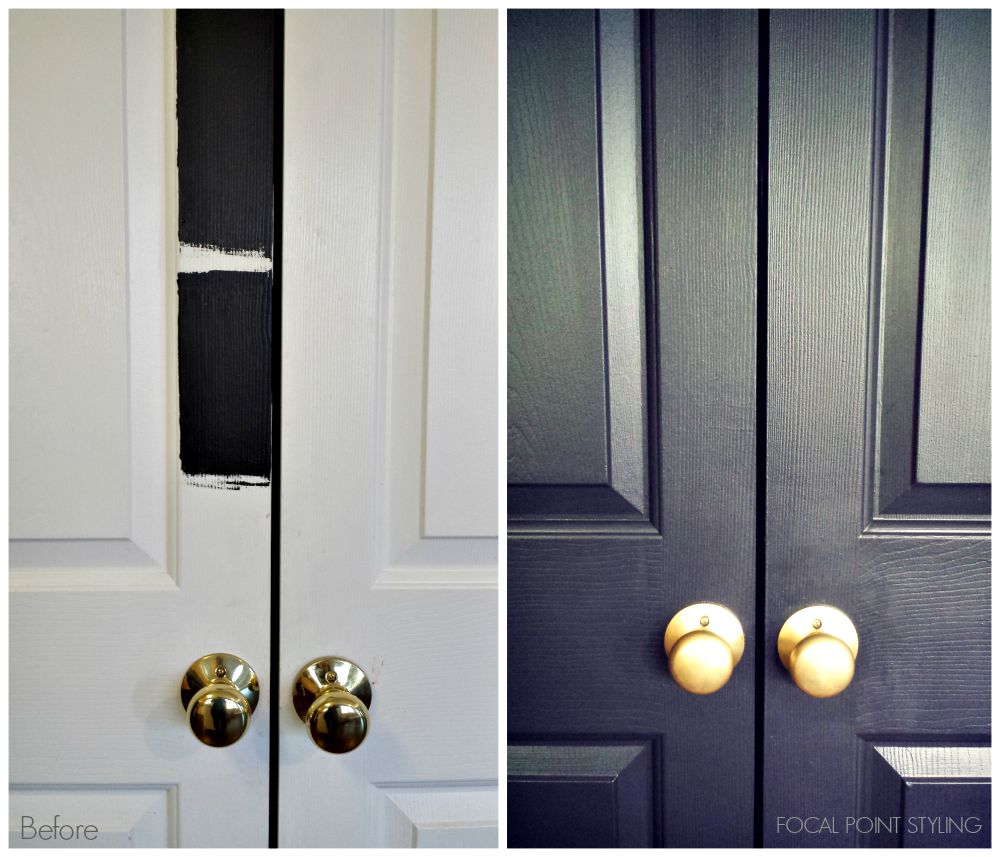
Black door painting - tape off hinges, and if you're keeping the hardware, you can just cover with foil if you'd rather not remove (but it's much easier to paint removing door handles!!) 

Painting Black Doors
Before - During - After

This house was built in 2005, so it was already starting to feel a little dated with the builder grade white doors, especially paired with the yellow-base polished brass door knobs. In the Florida townhome, we had updated all of the door handles to nickel levers, but I knew I didn't want to go the silver route here - not to mention, changing door hardware can start to become expensive, especially when it's for 14 doors in a house. Since I was painting the doors black, I tried something with the existing brass hardware - and it worked!

 Brass:
Dated & Polished (left) - Updated & satin (right) 

Updating brass hardware - from dated yellow & polished to brushed & updated satin finish.
No paint - No chemicals. Just sandpaper!


By simply taking one of my (fine) sanding blocks (I've used for furniture refinishing), I was able to buff off the dated yellow shine from the existing door knobs, and created a more matte, brushed brass - satin finish. This not only saved us the expense of changing the hardware, it also helped to salvage the existing hardware -- without any chemicals or added expense (other than buying another sanding block for under $5!)

So as my husband patched and sanded wall holes + painted Kilz in all of the closets (good germ killer when you're first moving in!!), and the painter we hired was painting the common areas of the house (LR, DR, Kitchen, hallway, stairway, master bedroom and bathrooms), I started my black door painting, and brass hardware update, along with painting all of the door casing and baseboards a crisp white.


The brushed brass door hardware also worked with the master bedroom doors I opted not to paint black, but instead I painted a darker grey. Out master bedroom has three doors (plus a pair of 15-lite french doors we added) which with our existing black furniture would have been WAY too much black in one space. the darker grey I used for the bedroom doors, I also used when I painted the existing 2 old oak bathroom cabinets (I'll share more about in an upcoming post!)


The hallway upstairs has another six door, two of which are a pair of bifold doors for the laundry closet. All are painted black, and I continued doing the satin finish brass hardware upstairs, except for the laundry closet doors - They originally had plain painted wood knobs, I replaced with a antique pair I picked up on our trip to Atlanta earlier this year (great souvenir!) 


Doors are updated - now just need to update hall light fixtures & floor covering!


For previous black paint choices, I've just grabbed any pure black paint I could find - But this project was going to be pretty big (12+ doors!!). I wanted smooth, strong coverage, with easy clean-up at an affordable price, and Behr paints fit the bill (not only for the doors, but for painting our entire home!)


Interior black door paint - Black Suede - Satin finish
Exterior black door paint - Black Suede - Satin finish
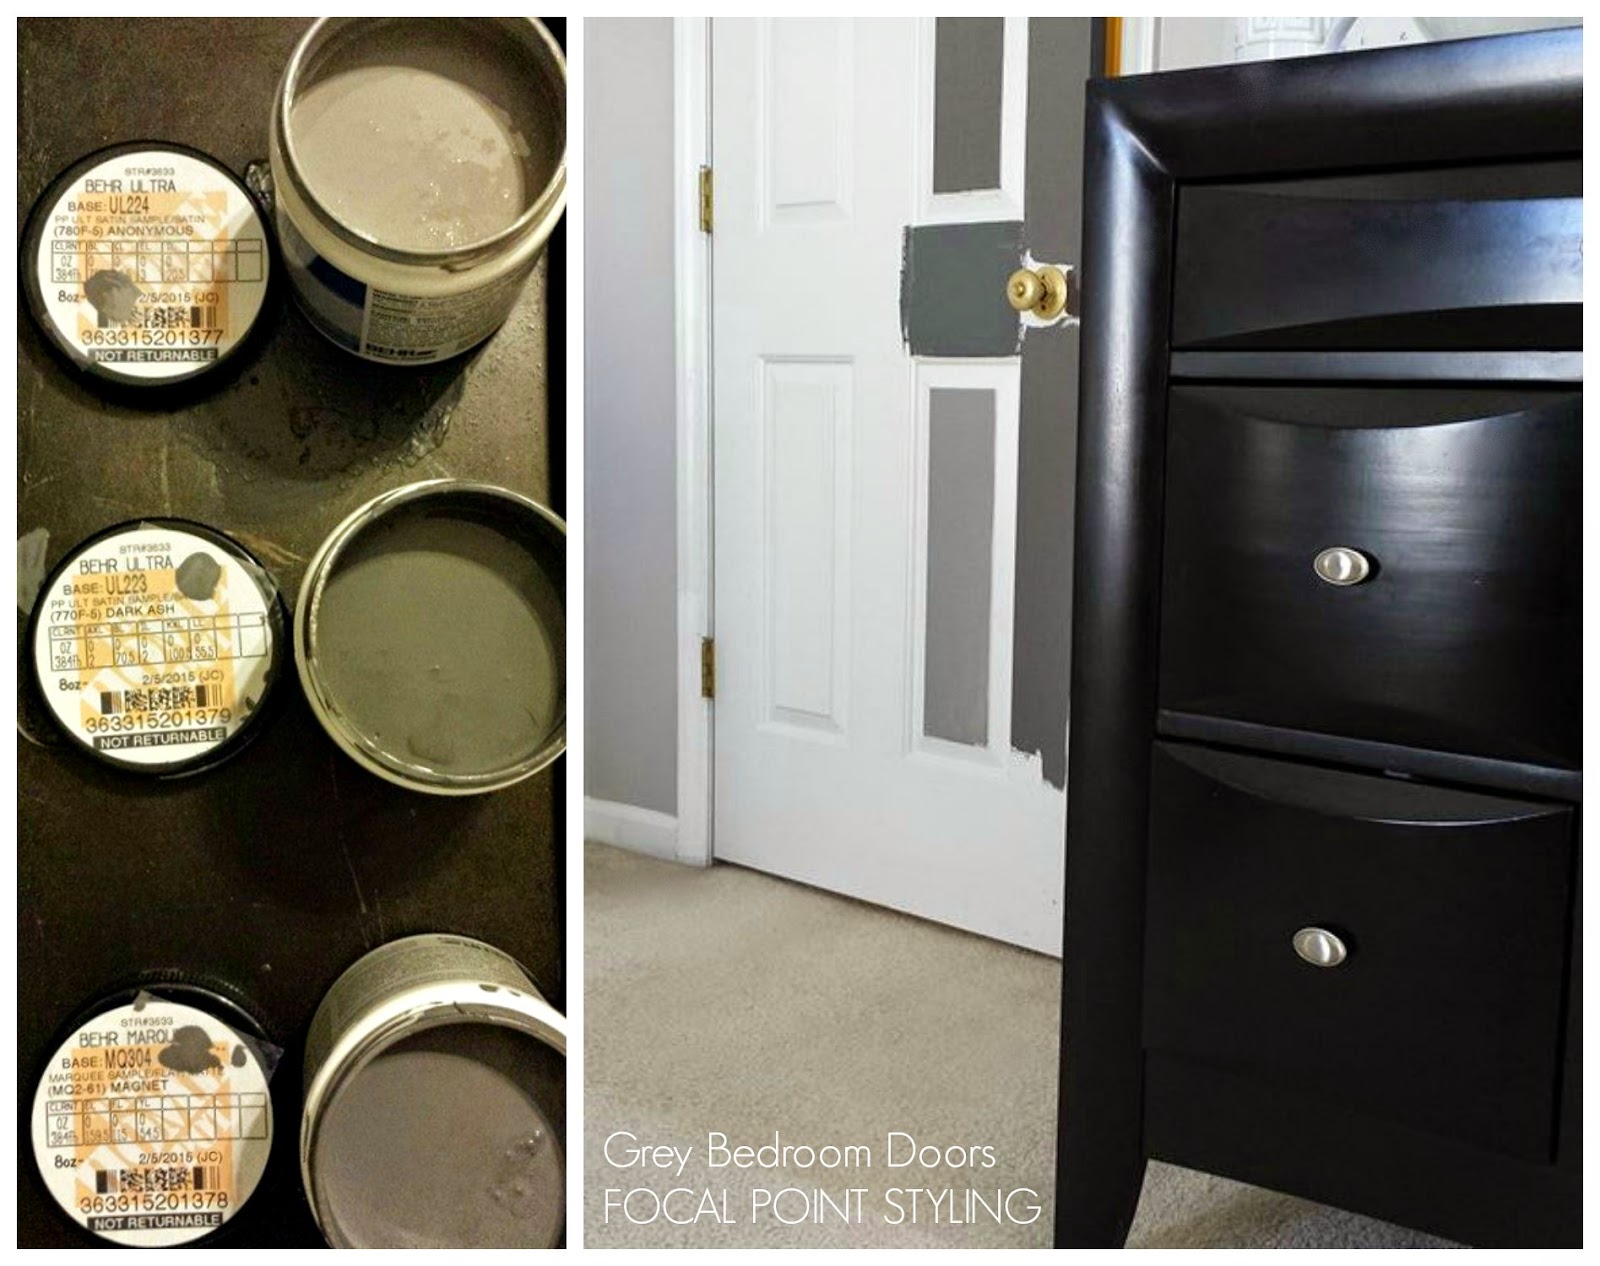
Interior grey door paint (master bed & bath)- Behr Marquee - Magnet - Satin Finish
Sandpaper block grade - Fine 


Paint is not only an economical means of updating the look of a home on a small budget, but using black paint, on doors, helps to give an updated and sophisticated look to a home. Consider painting your doors black if you are:


- Looking to refresh your home before the holidays.
- Seeking a more updated look before selling your home.
- Relocating and want to remove the builder grade style of your new dwelling.

And to really take classic black doors up a notch, try a high gloss black for your front door, inside and out! (which is on my 'to-do' list for Fall!) Think of high gloss black as adding a black patent clutch or pumps to your LBD!  


Hope you are inspired!
Thanks for stopping by!


Weekend Decorating - Splurge & Save On The Master Bedroom

Most people work full-time during the week, leaving only the weekends to pack in chores getting done, errands run, family time, couples time, and somewhere in there, fit in a little time to maintain  (or update) home decor. What helps to fit it in, is take a moment during the week, perhaps during lunch, to plan what tasks need to be completed, and little by little, tackle them and cross them off your list. Since we just moved this past November, getting settled has taken a little time, especially with the holidays, but it also means not every room has been rushed to get thrown together - we've been taking time to 'get to know' the new house and its spaces. One room that is finally (slowly) coming together for us is our master bedroom.


Now yes, it would be nice to toss out all the old furniture, rip up the rug, tear out the builders ceiling fan, but, as with most people, we don't have those kind of funds available. So how do you get the most bang for your buck? Planning. Have a vision of what you would like the end result to include: Added moldings around windows, crown molding for ceiling and tray ceiling, replace existing ceiling fan with a chandelier (or updated fandeleir), and eventually, change the rugs. Those are some of the bigger ticket items that can help refresh a master bedroom, and another is to work with what you have, making minor alterations (such as changing hardware on furniture, update art for walls, layer in a new metal, invest in better quality bed-linens and drapery panels, update decorative hardware - and of course: paint.

Just right find at The Red Collection!

 Gorgeous - but too large for wall space.

Left - too skinny. Right - too short & chipped.

Friday afternoon, I ventured out to a few of the local consignment shops, specially hunting for a new shape of mirror to hang over our existing silver-leaf chest of drawers. I was looking for oval, and found a few, but they were either too small, too large, too skinny, too short, or a good price (only $24!)  - but damaged. Since shopping consignment is pretty much a final sale (vs. shopping a specialty home  store), you really need to trust your gut - and follow your instincts. Although I was specifically looking for an oval mirror, I also kept my eyes open to what was around me and spotted an elongated octagon mirror - it was the correct scale, wide enough and tall enough for the space, it was gold and it was priced just right and not damaged. After I circled the shop two times (like one of Katy Perry's sharks! lol) I made my decision and said, this is the one!


Although the scale was right, the shade of gold was too yellow - but fear not! A quick dry-brush of a burnished gold from Ralph Lauren paint, and it became just the gem I was looking for. And perfect timing too, because the weekend before, I had finally found a sunburst mirror online, and it arrived Saturday morning. The sunburst mirror was a bit of a splurge at $59 (from Kirklands) but it had the right finish, and the right style of rays I had already been looking for, both in stores and online. A similar style on Overstock was $128 and the SAME mirror (from Overstock) was $500 (oh the games retailers play). To relate the two mirrors I bought for the space, I'm layering in a few other gold hints - one tiny detail being new drawer pulls for the furniture.

Tons of brass hardware at the Habitat for Humanity ReStore! 

Octagon knobs relate to the octagon mirror over the silver chest.

You would think that because drawer pulls and knobs are so small, their cost would be too - but no, their not. Luckily I remembered popping into a habitat ReStore back in Phoenix and was floored to have seen all of the gold hardware they had available. Makes sense though - so many people buying homes built in the 80s or 90s wanted to update to nickel, so they removed all the brass hardware - from bathrooms, from kitchens, from closets and doors. So when I knew I wanted to change the hardware on our existing furniture, I knew a source to check on would be the Habitat ReStore. It took a little digging, but I did find 3 octagon drawer pulls (from Hickory Hardware) two weekends ago in Greensboro, and found the 4th at another location in High Point. So this weekend, along with the mirrors, I also updated the bedroom side tables - I just need to find two smaller pulls for the top table pull-out. in the meantime, I just painted the pull front with the same gold mirror paint. And just need to change hardware to brass on the dresser too.


 Tested the back of the bedroom door to see how he greys would flow with existing wall color and the black furniture.


This past week, we also had the door opening to the accessory closet fitted for a pair of 15-lite French doors, which will be getting installed this Friday (yay!). And speaking of doors, I painted two of our bedroom doors a medium grey. Just like with picking paint for the house, testing the colors with tester samples was a huge help. C (Marquee - Magnet) was just the right shade of grey to pair with the existing pale grey walls (Behr - Gentle Rain).


Friday I picked out the greys (ONLY 3) and tested them on the back of the (black) bedroom door - watching their color change in different light: sundown, nightlight, candlelight, sunrise - made a decision, got the paint the next day, and now, builder white doors are gone - but again, maintaining the existing hardware (to help save on expenses - sanding the dated yellow tone & shine gave them a more vintage look)) - plus, this grey (Magnet) is the grey I'll use to 'quick-fix' update our bathroom vanity (until remodeled next year), creating color harmony in the spaces. Although I've done bold pattern mixes for the bedroom before, I'm using those mixes in common areas (such as the living room) and wanting a more soothing and sophisticated look for the bedroom.


Little by little, the new space is coming along - and without breaking the bank. Just a little saving here and there, mixed with a little splurge and paired with existing pieces - plus paint.


Very much looking forward to the doors getting installed Friday - French doors to allow the light from the accessory closet window to still come into the bedroom space (I love natural light - especially from the sun!) - Hoping to get them painted Sunday!

Thanks for stopping by!


LinkWithin

Related Posts with Thumbnails