Showing posts with label Black Doors. Show all posts

How To Paint Interior Doors Black & Update Brass Hardware

Fall is just around the corner, and for some, that can mean not only a change of season, but also wanting a change of scenery in the home. One way to create an updated look in a home is by painting your doors classic black. It's no secret: I love black! I love to wear black, my office used to be black, and when we lived in our Florida town home in 2010, I first started experimenting with painting doors black (read my post here). Although that first door was only the interior of the front door (because of HOA), I instantly fell in love with the transformation the black door gave to a builder basic white door. When we moved to Phoenix, and found a house to rent, I applied my love for black doors to our kitchen dining area, to help update the space + create more harmony in our rental home. Having white doors in an area with cherry kitchen cabinets, charcoal walls, and black appliances was just going to be too choppy (read more in my post: renters painting tips). Although I really wanted to, I refrained from painting all of those doors black, since we were renting. Fast forward to the home we bought November 2014, and one of the first tasks I did before the movers arrived was to paint all of the doors black - and wow, what a difference it made!


Satin black doors, satin brass hardware, updated light fixture, a runner, and a small entry vignette all ways to update a builder basic entry...

 Builder basic blah before...


Painting white doors black can become a tedious (and boring) project, but it helps to break it down to smaller paint projects - for example, paint doors black by 'line-of-sight' sections. This way, if you get side tracked by another task, you won't have one white door next to a black door in the same room. It also helps to focus on painting the door fronts first, and come back at another time to do the inside, because you may want to keep the backside white (for example for a pantry, powder room, or a small closet).


I did this, and I think this Fall, I'll go ahead and paint the backsides black (living in a space does that!). As for the door moldings, I'm contemplating whether or not to paint the white door casework black (or grey in the master) like the dark doors as well. I do though like the way the white relates to the baseboard and crown molding. Another option to consider with painting base & crown moldings is painting them the same color as the walls - but gloss. Chances are though, the next buyer here will prefer the white moldings too.

The one door in the house I did not paint black was the french door coming from the living room, opening to the backyard deck. All of our window mullions are white, and since I treated this door as a window - to give the fireplace symmetry, I framed it with window panels - I kept this door white. I love my black, but I'm not about to start painting all the white mullions black. Although I love that look too - the next person who lives here may not. This area is relatively conservative. And if they do, that leaves a project for them to personalize their space with.


When we changed the exterior door locks, we went ahead and purchased a more updated (transitional style) exterior door handle in an antique brass.


Also when we moved, I renewed our faded black exterior front door in an exterior black satin. Inside, I went ahead and painted the front door a satin black as well (along with the stairway railing & newel post!), but I think for Fall, I'm going to refresh the door - inside & out with a gloss black. Inside, the black gloss will help reflect more light in a small space, and outside, it will give a more sophisticated curb appeal.


Walls - Behr Porpoise (eggshell) - Trim semi-gloss white - Time to paint the doors black!

Black door painting - tape off hinges, and if you're keeping the hardware, you can just cover with foil if you'd rather not remove (but it's much easier to paint removing door handles!!) 

Painting Black Doors
Before - During - After

This house was built in 2005, so it was already starting to feel a little dated with the builder grade white doors, especially paired with the yellow-base polished brass door knobs. In the Florida townhome, we had updated all of the door handles to nickel levers, but I knew I didn't want to go the silver route here - not to mention, changing door hardware can start to become expensive, especially when it's for 14 doors in a house. Since I was painting the doors black, I tried something with the existing brass hardware - and it worked!


 Brass:
Dated & Polished (left) - Updated & satin (right) 

Updating brass hardware - from dated yellow & polished to brushed & updated satin finish.
No paint - No chemicals. Just sandpaper!


By simply taking one of my (fine) sanding blocks (I've used for furniture refinishing), I was able to buff off the dated yellow shine from the existing door knobs, and created a more matte, brushed brass - satin finish. This not only saved us the expense of changing the hardware, it also helped to salvage the existing hardware -- without any chemicals or added expense (other than buying another sanding block for under $5!)

So as my husband patched and sanded wall holes + painted Kilz in all of the closets (good germ killer when you're first moving in!!), and the painter we hired was painting the common areas of the house (LR, DR, Kitchen, hallway, stairway, master bedroom and bathrooms), I started my black door painting, and brass hardware update, along with painting all of the door casing and baseboards a crisp white.


The brushed brass door hardware also worked with the master bedroom doors I opted not to paint black, but instead I painted a darker grey. Out master bedroom has three doors (plus a pair of 15-lite french doors we added) which with our existing black furniture would have been WAY too much black in one space. the darker grey I used for the bedroom doors, I also used when I painted the existing 2 old oak bathroom cabinets (I'll share more about in an upcoming post!)


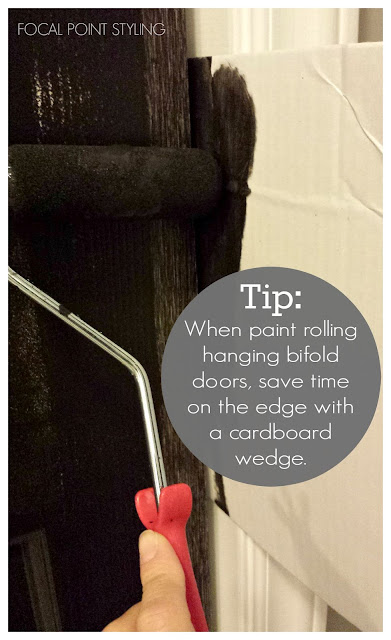
The hallway upstairs has another six door, two of which are a pair of bifold doors for the laundry closet. All are painted black, and I continued doing the satin finish brass hardware upstairs, except for the laundry closet doors - They originally had plain painted wood knobs, I replaced with a antique pair I picked up on our trip to Atlanta earlier this year (great souvenir!) 


Doors are updated - now just need to update hall light fixtures & floor covering!


For previous black paint choices, I've just grabbed any pure black paint I could find - But this project was going to be pretty big (12+ doors!!). I wanted smooth, strong coverage, with easy clean-up at an affordable price, and Behr paints fit the bill (not only for the doors, but for painting our entire home!)


Interior black door paint - Black Suede - Satin finish
Exterior black door paint - Black Suede - Satin finish
Interior grey door paint (master bed & bath)- Behr Marquee - Magnet - Satin Finish
Sandpaper block grade - Fine 


Paint is not only an economical means of updating the look of a home on a small budget, but using black paint, on doors, helps to give an updated and sophisticated look to a home. Consider painting your doors black if you are:


- Looking to refresh your home before the holidays.
- Seeking a more updated look before selling your home.
- Relocating and want to remove the builder grade style of your new dwelling.

And to really take classic black doors up a notch, try a high gloss black for your front door, inside and out! (which is on my 'to-do' list for Fall!) Think of high gloss black as adding a black patent clutch or pumps to your LBD!  


Hope you are inspired!
Thanks for stopping by!


Welcome August - A Quick Home Tour

Welcome August! I'm so grateful to be back east! So much has happened in the past year - In August last year, we were getting ready for Jeff to have back surgery. In September, just after Jeff's surgery /recovery, he got promoted - to a store here in North Carolina. In October, we had to house hunt, and lucked out finding a new home (within two weeks) in the Triad area. We purchased the home (basically via online from Arizona), and I began the purging and packing process - while Jeff had to report to his new job in North Carolina. In November, the movers arrived, loaded our Arizona rental home, and drove across the country (even in one of the early winter storms). We also closed on the house, and began the process of cleaning and painting (the common areas) before the movers arrived. A few days before Thanksgiving, the movers arrived, and (chaotically) unpacked the truck they unloaded the same day.


Since then, little by little, Jeff and I have transformed this house into our home - updating builder light fixtures, changing switches, refinishing furniture finds, organizing closets + garage, and still purging / donating items no longer fitting our new lifestyle + the energy of our new location, along with also updating the front yard and back deck.

Is the house perfect now? 
Not by any means, but together, we've done a lot, in a little bit of time, and without taking out a loan for any major renovations. How have we done this? By pacing ourselves - taking on projects in phases, a little at a time - and saving some of the larger projects for after living in the space, and living with what we really need, vs. overextending ourselves for what we want. 

Have there been hick-ups along the way? 
You betcha! The first shower Jeff took in this house created a leak downstairs to the (furnished) living room. In April, the dishwasher leaked - so badly, Jeff had to cut the ceiling open downstairs to allow the water to drain out - and aimed a small heater on a ladder to dry it out, before he repaired the ceiling. In May, the hot water heater died (thankfully no burst!), and had to be replaced. 

Best part of the move...
Thankfully, now that we're back east, we've been able to break away with road trips and even a trip down to Florida...

Catching up with long time friend, Diane, in Orlando, FL in June...

Yay! Made it to the east-coast beach - even better: in Florida!

 Jeff and Sammi - Graduation Day!

In between home repairs, we've been able to visit with family plus do more traveling: We drove to Atlanta in February - I attended DBC & Atlanta Market Day, while Jeff visited his mom. In March, my mom came up to visit us. In April, I attended High Point Market + the design showhouse. In June, we flew down to Florida for Jeff's niece's graduation, and we took a day trip over to Raleigh. We're planning on Jeff's mom coming up for Thanksgiving, plus my mom and aunt might be coming to visit in October (fingers crossed!) It's so good to be able to see family again...


 Historic Oakwood, Raleigh, NC

 Downtown K-ville, NC

 Architectural Salvage, Greensboro, NC

Living Local
Along with some major travel, I've also gotten to know a little more around my new area: Back in February, we went wine tasting at some local vineyards, and hope to visit more in the fall. I've also visited museums and farmers markets, the Reynolds Gardens in Winston-Salem, toured a historic district in Raleigh - plus check out a few local consignment shops such as the Red Collection in Greensboro, Furniture Emporium in Winston Salem, an architectural salvage shop in Greensboro, and a great Antique-Thrift shop down in High Point. I don't go thrifting here as much as I did in Phoenix - clothing consignment isn't as strong as it was in Scottsdale, so for fashion updates, I have had to turn to online sources such as Tradesy and ThredUp.

East Coast Style
Of course, the 'fun' part of moving, is having new spaces to create, organize, and personalize - pet friendly spaces to live in. I've shared some of the outdoor projects here on the blog, improvements and transformations - now it's time to take a peek inside. I've been sharing the transformations as they've happened over time on Facebook, but not everyone is on Facebook (like my mom or family!! lol) Here is a peek at some of the transformed and settled spaces for Harmon House...


Master Bedroom

 Dressing Room - Accessory Closet

Home Office

Guest Den

Entry Hall - Foyer 

Thrift Chair Makeover (Sephora's favorite spot!)

 Painted all doors black - Maintained existing brass hardware...

Dining Room

 Summer Style - Living Room

 There is still more we have done and still more to do - such as paint and set Jeff's mancave, a guest room downstairs, eventually remodel the master bathroom, and figure out where the Christmas tree will be this year - but for now (that my summer battle with bronchitis seems be be passing), I hope to inspire you in the next few posts, while sharing some of the details of the transformations that have happened! 


Good-bye July! Welcome August!
Grateful to be back east!
Stay tuned for inspiring transformation details and thanks for stopping by!


Exterior Home Improvements with Black - Shutters, Lights & Doors

Although there was a two day rain delay, our shutters finally got repaired and painted last weekend while we were away (Florida trip for Jeff's niece's graduation!) It's funny all the small details people don't see in a distance photo such as the faded color, missing bolts, bird-poop, even broken shutters - but living in a space, you see these details everyday (and so do the neighbors). I'm so happy they are repaired & painted (black satin - same as the front door) which now helps to give the home front a more crisp curb appeal...


Although Jeff and I are pretty hands on people, we did consult with and hire a professional for the much the needed painting & repairing shutters out front, along with a deck specialist for repairs, cleaning and staining out back. The person we hired to do the shutters was the same person we had hired to paint the interior common areas back when we moved here in November.


 Black mulch compliments the shutters - White flowers relate to window sashes and pop in contrast to the mulch.

I'd like to eventually add planter boxes to at least the four lower windows, to give some height behind the ball hedges, while still keeping a clean look out front. Since we're pacing ourselves with our home projects, that project will probably be next Spring's home improvement (or maybe for the Fall). 

  (both pics taken before shutters painted - updated pic at end of post)

Here is a outline of the home-exterior improvement progress:

Front:
1. Change the door hardware.
2. Paint the front door.
3. Change welcome matt & add potted plants.
4. Refresh house numbers.
5. Paint the railing.
6. Refresh the front yard landscape & pressure-wash walkway.
7. Repair & paint shutters.
8. Replace builder light fixtures

Back:
1. Repair & stain two-story deck.
2. Pressure-wash driveway
3. Paint garage & shed doors.

The back yard two-story deck is what we're working on now. We called three area deck specialists for a work-scope, quote and timing (they were booked to start in May) - I'll share more about the deck in the next post - but for now, here is a sneak peek at the color choice:


Left is too brown. Right is too grey. The center, which is Behr Deck-Over Slate color, is just right - but it will be color matched by Sherwin Williams Super Deck (because this is the brand our hired deck professional uses). The black deck in the back will also help relate the home front's shutters, doors, and lighting details, giving the exterior a cohesive feel -- just like we do on the inside... and the deck is almost done now!! - but back to the front...


After the deck is painted, and now that the front yard details are refreshed, I'd like to update the builder basic outdoor wall sconces. Not only are they faded, but they are too small for the scale of this house and the door proportions. 

 
 As of now, we're more the diagram to the left shown above. 
 

I've been sourcing locally and online for fixtures. Below are some lighting style options I've found online. Some outdoor light fixtures can cost upwardly well over $300 to $600 each (because of craftsmanship, quality, size, and brand) but I did find some better sized fixtures, for $90 to $120 each online - and even a customized house numbers plaque on etsy for only $25. I'll have to also check out the Habitat for Humanity ReStores, which is where I lucked out and found use a great casual dining area light fixture for only $35 (would sell for $350 easily!) When working with a small budget, you've just got to have patience...
 

In addition to updating the front of the house and the back deck getting painted black, we've also discussed eventually updating the look of the house side exterior from the builder basic white garage doors to a satin finish black, add black shutters to the centered window above, and also paint the shed door black - I've got the outdoor paint, roller and brushes, so this paint project can be an easy DIY, helping to save on the exterior improvement expenses (it just needs to be worked on at sunrise, when the temps are cooler, and sun on the east side). The only expense would be adding the extra pair of black louvered shutters, I believe would be $45 for the pair at Home Depot.


 I tried a dark grey first on the board, but the house side still looked washed out - The door accents look more striking and updated with the black, relating to the front. It's not that it's horrible right now, but it (to me) looks a little washed out. The home was built in 2005, and builders (even just up our street) now are using darker trims, accents, and colored carriage style garage doors.


I know -- it sounds like I'm using a LOT of black. But for this style house (symmetrical -  Georgian Colonial), plus the scale and existing colors, black is what helps keep the styling classic as well as add interest to an otherwise 'box' structure. Inside, using black helps to anchor a space. Outside, black  gives contrasting interest to the existing ecrew siding, mocha brick, and white trim.

As I've mentioned before, we're pacing ourselves with home improvements - nothing too shocking too the neighborhood and nothing too major to the wallet, because you never know when an unexpected expense can pop up (such as a crapped out water heater or an unexpected trip to the ER) But just simple refreshing treatments can make a difference. With the deck the focus now, the outdoor lights can be the 'Fall Update'... and next Spring: flower boxes at lower windows...

What color are your exterior doors (front door / garage door / back door)? Do you have shutters? If so, are they the same color as your doors? Our neighborhood has a few different color options people have done with their home exterior (front door, shutters, siding), and this detail, along with light fixture styles, is another way to bring your inside style - outdoors!

Thanks for stopping by!


LinkWithin

Related Posts with Thumbnails