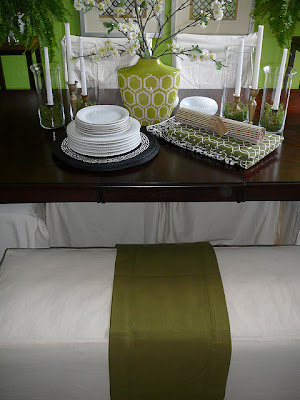
Are you looking for a stylish solution to update an old or basic bench? Do you think the only way to change its look is to re-upholster it? Do you have a minimal budget to work with? This may be just what you need - it's easy and quick too. Here's what I did...
Since I had added the bench to our dining room to change the seating look, I wanted to lighten it up - without tearing it apart. I've already removed the B&W area rug from the space, and (store bought) slipcovered the dining chairs - but the basic black tufted bench was looking too heavy. I didn't want this to be expensive, but I still wanted it to look stylish. Since painting the accent wall a few times for change, I've had the drop cloths in here. And the last time, I had draped the cloth on the dining table - but it had fallen onto the bench - DING DING - there lies (part of) the style solution!

Bench in refreshed space - but not quite right.
Bench covered now gives a more cohesive look to
the space - light and fresh for Spring!
You may have noticed the bench in a previous photo
The dining chairs slip covers are a cotton twill - canvas like - so a canvas drop cloth seemed like the perfect solution. When I went to Sherwin Williams to pick up the Lime Ricky paint to refresh the dining space for Spring, I noticed the drop cloths were on sale: A 9'x12' was on sale for $14. At that price, and with only needing 2 1/2 yards, a custom slip cover would be under $7.
Sherwin Williams - Lime Ricky
The added bonus: I'd be able to make even more projects from the one drop cloth later. I'm not there (yet) although I do have a few ideas swimming around my head (besides using it at a table cover). Since I don't sew, I did have some help from a friend...
Lynda & Jose - Friends for 17 years!
Thanks Jose!!!
I also don't have my moms machine up here yet, but my friend Jose is all hooked up! He's mentioned coming over to teach me to sew or for me to come back over for a lesson - so off I went! I loaded the bench in my car, along with the drop cloth, and after a delicious Sunday brunch at his home (and little visit from an old friend Steve), Jose and I went to his studio to get to work.
Inside Jose's Studio - Not only has he created a beautiful line of custom pillows and throws, he has also gotten back to his roots of designing and creating a clothing line, which I have also been collaborating on with him.
And now... back to the bench.
It's a simple basic black leather tufted bench.
The dimensions were measered TWICE, and
a 1/2" was added to the panels for salvege and seam allowance.
Time to cut - the pieces.
Press pieces OR you could also wash the fabric
first (to pre-shrink) and then press before cutting.
Salvadge the edges to prevent fraying.
After edges salvaged, straight stitch pieces together.
Press seams flat.
Testing...
And for added comfort, add batting to the inside of the cover.
Since this bench is tufted, using left over quilted fabric made it more comfortable.
Batting side up to attach to slipcover - velvet side down - facing leather bench.
Sweet! Clean & casual - just what I had envisioned!
You can also add your own personal touch by stenciling a border or adding ribbon to the bottom. You can bedazzel the bitch or you can also stencil a pattern on it. And there is also another way you can change its look:
... To dress it up or add a pop of color - Try banding...
I banded my bench by repuposing table runners. Banding is a trademark style of my interior design idol: Kelly Hoppen. Banding is a simple way to add a splash of color to a basic styled piece. Using table runners for banding gives great multiple options for adding color, pattern, and to change the look of the bench. You can also use banding on your chairs, pillows or bed. It also gives another use for all your table runners!
This B&W runner worked great to add a graphic element on the bench for one of the
Easter / Spring tablescapes I came up with. I'll be sharing those with you, along with some
table styling tips next week...
Stay tuned for a sneak peak of some other table styles
and hop back over next week for more design details and table tips!
Have a wonderful weekend!
LINKING POST TO:

.jpg)
.jpg)
.jpg)
.jpg)
.jpg)
.jpg)
.jpg)

.jpg)
.jpg)


