Showing posts with label DETAILS. Show all posts

FIVE FRUGAL FINDS TO HELP REFRESH A SPACE

Knowing the homeowners budget and without breaking the bank, I was able to makeover a space without expensive details. I found several charming and functional finds to the easily mix old & new accessories - for much under $20. All I needed was an afternoon (or two) to do a little savvy & thrifty shopping - shifting through clearance and rummaging through thrift - to find these stylish details. To help overspending or accumulate too many returns, I shopped for the details closer to the end of the project. Armed with a list of specifics, here are five frugal finds I gathered for a recent bedroom makeover I did...


Easy on the eye bedside vignette - mixing old (thrifted finds) with
new (clearance goods).


Spotted on Clearance at Homegoods.


Spotted on clearance at Target.


Put together to make a lovely little find.


1. THINK OUT OF THE BOX: I've always liked the look of the structured square container filled with a colorful flower bunch, and that's what I did with these cream rattan tissues boxes I found on clearance at Homegoods for only $2 each. Repurposing the tissue box as the flower containers gave a modern look to these pink corsages I spotted on a clearance end-cap in Target. They were easy to make and a great add for under $16 for a bed & bath makeover . The same concept can be used to also make simple centerpieces for a tablescape - using a globe with water inside and fresh flowers.


Spotted at Goodwill


Easily, two floating shelves can add extra storage space above the WC, but in the meantime, relocating on of the homeowners pictures worked in the space.


2. GIVE FUNCTION TO A FORM: A metal thrifted jar for $3 holds everyday toiletries on the counter- making it easier for the homeowner to get to. It also gives a function to a decorative form on a small counter space.


  3. LAYER LIGHT IN A ROOM: Thrifted ceramic sconces for $2 helped layer light in the bedroom, without having the expense of an electrician.


Also spotted at Goodwill


Stylish jewelry storage in a refinished thrifted console - either use your own family treasures or shop thrift to create your own collection.


4.  ADD ORDER & SHINE WITH A TRAY: A $5 thrifted silver tray adds sparkle and also helps protect the thrifted consoles painted finish. The oval shape is also a nice feminine touch for a (single & in 60's) ladies bedroom.


Spotted at Out Of The Closet Thrift Shop


5. IMAGINE THE POSSIBILITIES: A pair of thrifted silver scalloped bowls, for only $5.99 for the pair, could easily be used as a decorative soap dish in a bathroom or candy dish in the living room - but on a nightstand, they give a pretty place to display personal strands of pearls. Displaying some of your jewelry in a space is a great way to personalize it, plus with pearls, gives a feminine touch.


The hammered glass hurricane to the left was another HomeGoods clearance find ($8) - and paired with a pierced tin flower pot from Ikea. It added a lacey detail in the space, without the frill (but after pic taken, I relocated it elsewhere in the room).

The savings from shopping thrift and clearance for accessories plus shopping thrift for the console and end tables, allowed for the splurge on the honey-comb glazed lamps ($60).

 
What frugal finds have you spotted lately?
Happy Thrifty Thursday!


SNEAK PEEK & PROCESS OF A CLIENT PROJECT

This client project for Vero has been a wonderful learning experience. I was able to apply my skills from managing projects at a 155,000 sq. ft. retail establishment and apply them to this project. Some of which have been: conceptualizing a Plan A, B, and a C for the client to choose from, communicating, organizing, time management, planning, budgeting, creating and executing. Some of the unforeseen experiences have been: items not in stock, items on back order, and deliveries being held. Some other unforeseen experiences have been the assembly of products ordered.

BEFORE

DURING PROCESS

READY TO ADD THE DETAILS

Visioning, planning and executing a design plan for a client is NOT like what they show on HGTV. It's a little more intense, especially since I don't have a cast of assistants to delegate tasks to. Fortunately, my husband lended a helping hand - on two of his days off from work. Between his truck, my car and two trips, we were able to pick up all the thrifted furniture finds in a day. I spent three days sanding and prepping the four tables to be installed. Friday, we loaded three of the unfinished pieces, along with tools and textiles to bring down to the project site.

Advil, coke lists, tools, and packed Jeff's truck too...

My Jetta was PACKED!!
Need to consider a larger vehicle... lol

Since the clients patio is empty, I set up shop for painting and staining. Before heading outside, I removed all unusable pieces from the site into storage in her garage. I brought in all the delivered online orders and set the into one space. My husband (bless his heart) put together four dining chairs and the four slipper chairs while I headed out to the patio refinish the other pieces. We quickly learned the tool sent with the chairs is basically useless. He had to make a Home Depot run (or two) for a drill driver attachment to build the chairs (which got done in no time after having the correct tools.)

Shipment boxes helped protect pavers and a sheet clipped to fence
helped protect it from overspray.

Bringing the outdoors in: Stain of table similar to bamboo fence on patio.

Primed and painted coffee and side tables black satin.

I unpacked and built the two ottomans and two floor lamps. I collected boxes as we worked and broke them down for trash - however, some of the boxes I repurposed to better protect the patio under the drop cloths. At the end of the night, I placed the rug pad & rolled out the area rug. We placed the furniture where I had planned it - all except one piece: the refinished round coffee table. It had to remain outside because it still had not dried and we were needing to turn it on its side to get it through the sliding door.

Messy Friday afternoon - but I LOVED it!!

$40 thrift table sanded at home - transported raw - and stained on site
to prevent scratches in transfer.

Overnite protection - a coffee table fort - lol.

Luckily, the patio had a bit of an over hang, so I put a drop cloth down in the corner - close to the house - Jeff and I carried the table over to it, and we used the flat boxes again to sort of build a fort around the table. I used some left over pavers I found in a pile, to help anchor the boxes, and then we covered it with a sheet and prayed it wouldn't rain.

Little $5 side table

Ombre-like fade for bottom shelf. Black was too dark. White was too bright. Using the wood stain and rubbing it off - but keeping darker along the edges was just right.

Jeff left at 8pm, and I left an hour later to clean up a little more, and prep and plan the next day. Jeff had to be at work at 6am, and I came back down to continue with my painting mess. Vero didn't want the hassle of repainting the entire townhome and she was OK with its color, so I had suggested she at least have the base boards, door casings and doors painted a fresh coat of white (semi gloss) to refresh the space.

Details in the bag.
Accessories staged in the kitchen in partially opened bags.
Great to pick from, clean up at kitchen sink
& delable at counter. If not used - already packed in a bag to be returned.

Saturday I brought down another load: all the good stuff: THE DETAILS =) and one last table to refinish. I stopped by Lowe's to pick up hardware to convert handles on the new pieces as well as some of her existing pieces. Although she wanted a clean - hotel looking space, her favorite store to shop for furnishings is Bombay Company. Bombay is VERY traditional in its style. So to help update to existing pieces, I changed the hardware, and the one table (a demi-lune) I'm painting over the table top (it has a gold and red acanthus leaf pattern - also VERY traditional - and no red is planned for this space.)

Updated hardware - but new screw too long.
I made a washer by poking a hole in a furniture foot pad disc.
(It's what I had on-hand)

She's OK with it being painted. Since I set it against an existing wall mirror, and you can see it's profile when you enter the space, I chose crystal knobs, which will pick up on the other glass pieces in the space. Unfortunately, with everything that was installed this weekend, two major details were not: The window panels & hardware and the buffet. The panels and hardware were on back order, but I checked status this morning and it is ready to go - hopefully it will be here by this weekend (we're really wanting for our mom's to come and see - but when the panels go up.

Wall decal quote on order for mirror.
I'm painting the frame black and the wall around it a charcoal-mocha I found in the OOPS! paint for $2. The previous owner of this townhome had a stained glass panel here. When he moved - he took it. The mirror works to help reflect more light into the "L" shaped space - especially since there is only one window downstairs.


From what Vero has seen so far - SHE LOVES IT! and now wants me to do her bedroom, and we'll probably get something set-up on her gorgeous patio. She has some metal and glass tables in the garage, with a little protective coating, they could work outside. All we need to do is locate some bargain seating (which should be easy because it's end of season and there or some great deals out there.)


My mom is also wanting me to come down this week to help her makeover her bedroom, and Vero may have another potential client for me: a lawyer who needs her office done. I'm achy, but not exhausted - I've been running on so much energy fueled by passion, enthusiasm, and joy.


It was a labor of love and that's what made it EZ...

This is my first client project and like I previously mentioned - no assistants running errands, or custom pieces being worked on at a shop. The budget didn't allow for all that... and that is where true creativity comes into play - make something out of nothing and make do with what you have. Spend a good amount of time researching sources, keep your notes and receipts organized, communicate with client and run with it - MAKE IT HAPPEN!!

I'll post more of a reveal on Wednesday - but so far - what do you think?


LINKING TO:


HAVING FUN WITH A FIRST CLIENT!


Yup... you read right! An old friend from high school (a BFF no less) asked for me to help her in her quest to turn  her previously rented-out townhouse into a new home for her and her two kids. After loosing touch for a few years, we reconnected about a year ago on facebook! We periodically posted on each others walls to keep in touch (usually she posted pics of being out on the boat) so I can't express how happy I was to see an email from her, asking if she could hire me to help her.

Bed & paint color to stay, although I'm thinking of moving the bed to the window wall (the view while in bed looks at the bathroom). I'll be working more with this space after I get the lower level set.


Paint color & sofa to stay - other pieces can go
(maybe to craigslist to add funds to the budget!)


Board on left was option 1 and then better applied to show
space flow to option 2 - board on right.

Besides seeing her in person last Thursday evening, it's been a joy sourcing the Internet and shops for finds and creating a new look for her transitional life. The funny thing is, from the magazines and catalogs I brought to share (to get a sense of her style now) she kept going back to photos I've posted of our townhome. The one she showed the most excitement over was Cash Cab. She said she really likes my style and trusts me in my selections for her... 


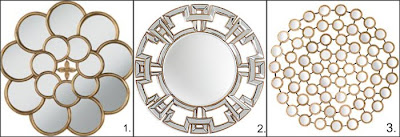
She really loved these mirrors. Mirrors will help reflect
light onto the spaces, as well as add a touch of glam.


Keeping this in mind, along with her response to the numerous questions I've asked her, I've organized folders of categories on my computer, as well as creating sets on Olioboard. Sending all the pics over to Oliboard is helping to conceptualize the space for her, as well as me. She wanted something clutter free, clean and comfortable as somewhat of a retreat from the day. What came to my mind is a hotel style look. I was also able to send over all the sets and she's loving all the selections so far! (woo-hoo!)


The splurge to fit into the budget is to try to fit in changing the  three lower level ceiling fixtures. Two of number 2 or 4, with i or 3 replacing the existing chandelier.


Column floor lamps can help luminate corners
or help designate spaces when used in pairs.

We both spotted lamp 1 while separately visiting Pier 1 over the weekend - so it looks like it's a must. I'm thinking of using two on a table behind sofa - which will also bring sofa away from the wall (and give some hidden storage as well.

She doesn't care for salon styled artwork, so art will be in pairs, triptychs, or quads. To help define the dining space from the living space in her open plan, I'd like to mount one over sized piece, and flank it with either two rectangular column-like floor lamps or two rectangular mirrored sconces I spotted online at ZGallerie. I've lucked out finding a round pedestal dining table at Pier 1 on clearance for only $149... and I may go for Ikea parsons chairs, but add nail head trim (unless I spot a thrift find to refinish!).

Numbers 1 and 3 may be too brown and muddy...

Clean & graphic 1 & 3. Number 2 may be too busy and too light for floor.

After sending her some selections - which she likes for the most part - I'll just need to look for a replacement for the zebra rug (she got me! that piece was more me than her). But that's ok - that's why I always have options when presenting a vision to people (did a LOT of that working at JCPenney's!!)

No on 1. Loving 2, but a bit pricey for budget.

Number three fits well within budget, mimics colors of the zebra rug, but a more clean - graphic look. To also help save some money, I'm thinking I could use one 8x10 rug in Living area, and none in the Dining or Sitting area - because the space is shaped like an "L". But I will keep an eye out for a round rug for sitting area in front of the TV.


This is going to be a fun and new adventure... It further demonstrates two things: When one door closes, another one opens and the advice from a designer friend (Judith Balis of Nest Interiors) who earlier this year said - "just throw yourself out into the universe!" I think by accepting the invitation from Granite Transformations to temporarily work down at the Design District showroom, it opened this universal door. I'd like to expand it by looking into helping people set up their holiday decorations or parties.


Mix of details: whites will pop!


Trays will help keep things organized. Glass will add shimmer.


Smoke & metal details will add elegance.

For the moment, since this is the first time I've done this (for someone other than myself, my mom, or a store), I'm working out some kinks as I go along (for example figuring how to transport larger pieces and when since I have a Jetta - the hubs has a truck). The other challenge is "getting the look for less". But that I am confident I will be able to do between online searches, coupons & discounts, and of course - SHOPPING THRIFT! Which I'm going to take a drive up to Faith Farm Thrift later today to search for some finds... Wish me luck!

Extra seating and storage...
which will also work well with her existing sofa.


Comfy arm chair with ottoman near TV. Two slipper or armless chairs for a conversation nook in sitting area - near TV area in my Option 1 of 3 plan.


Round pedestal table (1) found at Pier 1 on clearance for $149.
It can work in the dining space and work well with parsons chairs (which can easily be upgraded with a nail-head detail).


She would like help setting up the entire townhome, so phase one is getting the lower level and her master bedroom set. I've kept most of the palette neutral to be able to add a simple pop of color (like a shot of teal, turq or green). There are also a pink & blue room for the kids (who spend a lot of time at grandma's house nearby), and she does already have some items for these spaces - I'll help style & finesse. I'd like to spend a day taking photos of the kids - maybe playing on the beach or playground - to use probably in the stairway. She's not looking to do any demo or reno. She'd rather not paint anything - but I am suggesting all trim and doors get a refreshed coat of white, and I'd also like to paint one or two accent walls (the TV wall downstairs and maybe in the master bedroom). She'd rather not do any of the shopping, so I'll be sourcing, planning, shopping, setting and styling everything (woot!) There is an eat-in area in the kitchen to be set where I may use a quad of framed photos I recently shot at a market while visiting up in Georgia. There is also a beautiful bamboo & paver garden patio to set; to keep it simple, I've suggested four club chairs around a fire pit (needs to be simple because the more outside - the more needing to be brought in for a hurricane).

I'll be keeping you "posted" with the project progress...
Thanks for stopping by!


LinkWithin

Related Posts with Thumbnails