Showing posts with label mixing metals. Show all posts

NON-MANTEL MANTEL & BOOKSHELF HOLIDAY DISPLAYS

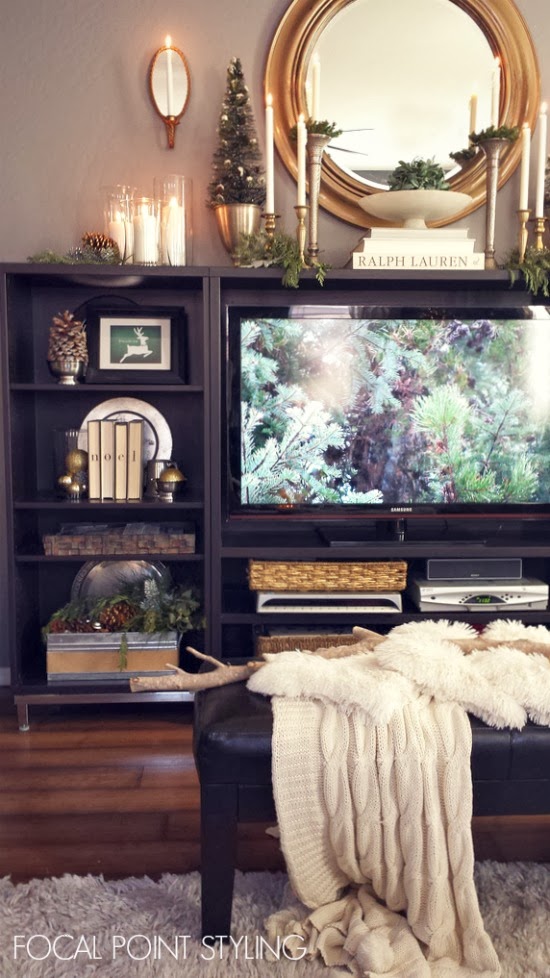
No fireplace? No problem! Besides tuning the TV onto a Yule Log DVD or music channel to create a fireplace, a low-profile bookcase can be the foundation to create a mantel display. We have a Besta unit from Ikea that not only allows me to create a mantel display, it also has adjustable shelving for storage plus space for me to create simple holidays displays. With Christmas being about traditions, one tradition I started last year (thanks to inspiration on Pinterest!) and I implemented again this year was the NOEL book decor detail. I also reused my galvanized tins for pinecone & fresh greens arrangements (great to give weight to the lower shelves.) And this year, I switched our framed photos for two reindeer chalkboard printables I found on Pinterest -- I just converted them to green chalkboard (like I did for our Christmas Kitchen). In addition to converting the images to green, I added holy to the silhouette and named the two deers: Dancer and Prancer.  On each shelf, behind each display, I use my silver chargers and trays I've collected over the years. Doing this is an alternative to painting the bookshelf back or making fabric inserts. Besides the bookshelves being dressed for holiday, everyday decor magazines are stored in trays, extra throws are in baskets, and I also keep my laptop and accessories + papers in a basket tray on the lower shelves.


On the unit top, my mantel, gathered and displayed white candles in clear glass containers plus I mixed metals with my taper candle holders. Although these are everyday decor items, I mostly only use them at Christmas time, which makes them look a little more special. Clustering the candles in the one location (the mantel) helps create a heat source in winter for us, plus the glow is really pretty and it makes it easier to put out all the candles (and not forget one). Last year, I repurposed green legwarmers as candle cozies. This year, I left the glass holders clear & simple. To give the mantel some added color, I used fresh winter greens mixed in clusters with gilded pinecones on the mantel.  The centerpiece is the same mirror as last year, but I painted it gold, to work with my other gold mirrors in the living room. I stacked the books again under the mirror, and this year I used a white alabaster pedestal bowl I picked up at Goodwill earlier this year.  The center is flanked by my two bottle brush trees + silver containers (now tarnished because I've had for over ten years, but still look great!)


Behind my holiday style...

Simple bookshelf styling with DIY projects & collected finds from thrift. I kept the fresh greens only on the top and in the two lower arrangements - making the shelves easier to keep clean with a Swiffer during holiday time.

Converted black chalkboard printable to green with PicMonkey.

Refreshed existing gold plus a black round mirror to gold.


The cable channel Yule Log screen saver is too orange for all this green, but Winter greens works great as a TV screensaver, plays holiday music and rids the void of the big black box for holiday. The BESTA unit measurements are: 94.5" W x 15.75" D x 50" H

 Keeping a candle snuffer handy (over on the coffee table) makes putting out all these candle simple & safe.


Although my first Christmases were spent in a home with a fireplace, I've never lived in a home with one to decorate. Using the low-profile TV unit / bookcase is a great alternative to create a festive and still functional holiday focal point. For winter, I'll just clean-up the unit by removing the greens and keep everything else, until my Spring ReStyle.

Early on, I was influenced by branches, pinecones, and holiday mantel decor.
My mom, pictured here with me, made the one on this mantel at my Aunt Mary's house.


Hope you are enjoying your Winter Holiday Season!
Be sure to pin and save some ideas for next holiday decorating season!
Merry Christmas!


Thanks for stopping by,


Moodboard Monday: Emerald Green & Leopard

I don't know what it is about this combination of emerald green and leopard, but I've pinned a few pictures of this combination - and I LOVE it! I first noticed it back in the fall, mainly because I was looking for pins with animal print. But since a few more pins popped up with these spots paired with emerald, I've been inspired again. I would LOVE to use the combo in an interior, especially paired with gold...


Photos above and more can be seen at my

I did apply the combination inspiration from Pinterest to a board I made at Olioboard,
but with a twist: I mixed metals: Gold & Copper


I love being able to utilize both of these sites! It is going to be such a time saver for sourcing and communicating looks!


And the green doesn't even need to be paired with leopard literally. The grassy, emerald, jade and Kelly greens in this Roosevelt Pottery look fantastic paired with naturals - from mixed woods to pets...


But there is just something about that little pop of leopard paired with green that is just rrrrreeeeooowww! :)


What's inspiring you lately? A look you've seen on Pinterest? A style you've seen in a magazine? Or a color you've seen featured in a store?

Thanks for stopping by!


DIY: How to give an old nickel bowl a new look with gold

When I packed us to move, I wasn't suppose to pack up any liquids - including paint. Although I left behind most of my paints, I did manage to pack up nine quarts - Sorry, but I just bought that gold quart in August and that puppy was comin' with me!! And I'm glad I did - Monday afternoon, while putting up more picture & mirrors around here, I was able to grab the can from the garage to freshen up a few frames - plus try something: a gold painted finish on an old nickel bowl...


Love using cheap chip brushes...
And just pulled from the recycling bin: a granola box & newspaper
to paint the bowl in place on the coffee table. I almost did the bowl with stripes, and that could have looked cool, but I went solid...


LOVE the finish and it dried quick too!


I only painted the top - the sides and bottom are still silver, which
works well with my metal mix!


The paint was from Rust-oleum - I had used it back in August when  I painted some mirror frames gold to refresh my (then) existing gallery wall...


I use to have three pieces of coral in the bowl, which I'd like to still add, but I just wanted to be sure the gold dried well. I'll probably dig out some shells & coral today from the garage - not all of them, just a few mementos to have around as reminders & stories of where we've been...


Also on the coffee table are these two crosses I picked up here thrifting here in Arizona - one nickel and one brass only $1 each. The patterned plate I picked up last year on clearance for $4 at West Elm Downtown Miami. The feather we found while walking on Hallendale Beach last Spring...


Last year my coffee table was gold. Now the few touches of gold on our old coffee table  relate to the new gallery I made behind the sofa... I'll post & share but - here's a sneak peek until then :)


Thanks for stopping by!


DIY: RUSTIC FARMSTYLE FAUX GALVANIZED STARS

Although I'm re-using most all of my Christmas trim here in our new place, something was missing. It's been a little challenging to learn the new flow of this space. But one simple item made the connection: a star. Funny thing, I used my old Papier-mâché stars in the kitchen, and my keepsake star mixed in a basket of pinecones, but the inspiration actually came from Arizona State flag. But I didn't want to just run out, buy some stars and slap them up on trees, wreaths and garland. So I tried something, and it worked! Here's the look (from just simple silver card stock stars from Party City) and here's what I did to get it:


Silver stars from Party City work best for this... 
However, if they do not have the silver finish in the size you're needing, buy either white or gold, and spray paint it silver. I too had to do this, but on paper products, it's better to use DESIGN MASTER brand spray paint (also works on Styrofoam).


Using a 120 grade sand paper, LIGHTLY sand the star one way, 
then turn slightly to go the other way. 

This will make a hatch pattern. NOTE: When sanding, do not go back and forth - it's not a table or chair. Just scratch the foil surface slightly in areas - especially the center.

Mist the silver star lightly with dark bronze spray.
I also tried to spray mist first, and scratch after - both ways work. But again, these work best on the silver stars (must be the make up of the Mylar). I tried it on the gold, but the gold is more delicate and it tore. To age gold, just mist with bronze, and don't scratch.

These were white and gold stars I misted with silver, then misted with the bronze.

Some are with scratches and some are more speckled.
They dry pretty quick, so you can add your personal details to them.


Since I've already been using twine in my decor this year (to adapt a more rustic style to new location),I also used them on the stars.

For all stars, I looped the twine through the hole at the top...

Then just banded the hole by criss crossing 3 times...

For small stars, I knotted and cut off the twine at the top. For the medium and large stars, I used a longer piece of twine, criss-crossed in front, wrapped the legs twice, and tied twine to the back.


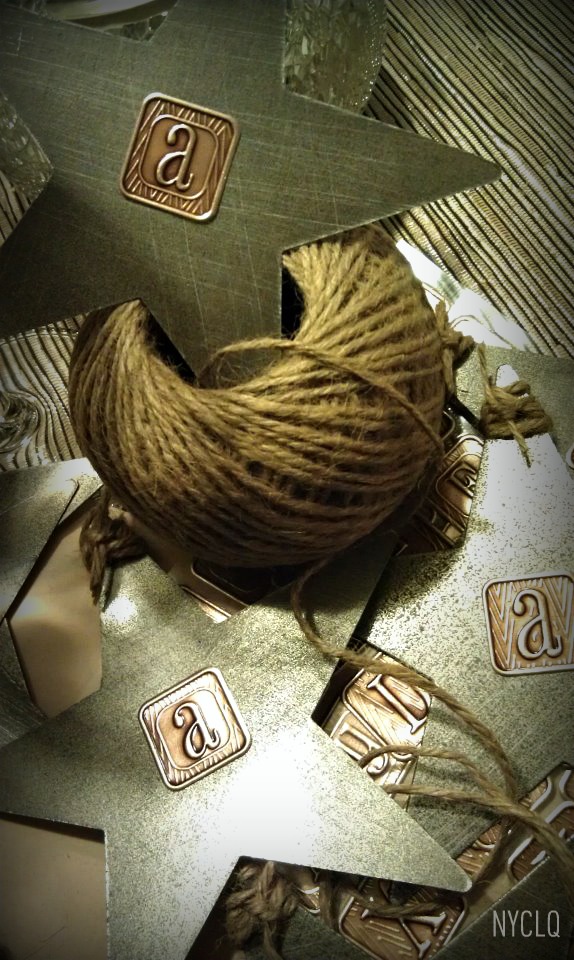
For additional details to some of the stars, I used these raised silver & gold pinecone stickers I spotted at Micheal's. I only used these pinecone stars on the center of my wreaths. For smaller stars, I used initial decals, but not our initials and not NYC....

I used the AZs....
But not all stars need to be embellished...


Sometimes less is more, and it gave more interest, especially to the tree, to mix up the looks of the stars. They still all work together because of the finish and twine.


These smaller stars are also great to use for:
Place setting cards or gift tags.

But I LOVE them mixed on to the tree!


By day... or...

by night....


And even though I used the white tree and wreath in our living room, I had also used my green tree (upstairs in the loft) , green wreaths, and green garland - outside (to be posted later - My First Stoop!)  and in the stairway...


Garland initials used: (L) Lynda, (J) Jeff, and (S) Sephora , plus a little bit of twine woven through the garland. If I had an outlet here, I would have loved to have done lights!


Under each of the 3 wreaths in the loft windows  wreath is a simple candlestick light, all plugged into a remote control plug so they all go on at the same time. It looks pretty from outside - the simple light and silhouette of the wreath.

Soooo simple and so easy to do. I'm sure for some of you bloggers, this is just a thought starter and you can just go to town adding more to it :) They can also be versatile and be used as part of birthday or any Patriotic holiday decor. But for me, these stars were my missing link for a cohesive look and feel to our new home for the holidays (even if we're only renting) ... and I really feel like it embraces the new place where we're at! 

What do you think?

In between doing address changes & profile updates online, I'm editing and putting together room pics for a holiday house tour, I'll be posting Monday.


Thanks for stopping by!!


Sharing post at the


ALSO LINKED POST TO:


LinkWithin

Related Posts with Thumbnails